Rear room lamp
When replacing the bulb, put the rear room lamp switch into the “OFF” position.
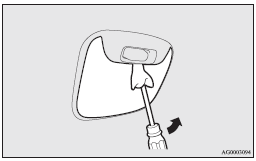
1. Insert a straight blade (or minus) screwdriver with a cloth over its tip into the notch of the lamp assembly and pry gently to remove the lens.
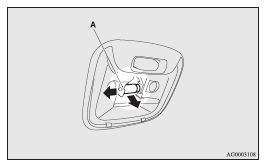
2. While holding down the tab (A), pull out the bulb.
3. To install the bulb, perform the removal steps in reverse.
![]() Note
Note
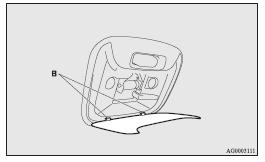
► When mounting the lens, align the tabs (B) with the holes on the vehicle body.
See also:
Front fog lamp indication lamp
This lamp illuminates while the front fog lamps are on. ...
The front airbags and driver’s knee airbag ARE NOT DESIGNED TO DEPLOY when…
The front airbags and driver’s knee airbag are not designed to deploy in conditions
where they cannot typically provide protection to the occupant.
Such conditions are shown in the illustration.
...
Starting the engine (petrol-powered vehicles)
The starting procedure is as follows: 1. Fasten the seat belt.
2. Make sure the parking brake is applied.
3. Depress and hold the brake pedal.
4. Fully depress the clutch pedal. (M/T)
Note
υ ...