3-point type seat belt with 2 buckles
3-point type seat belt with 2 buckles is fitted in the rear centre seating position.
To fasten
1. Pull the seat belt out slowly and pass it through the seat belt guide (A).
![]() NOTE
NOTE
• When the seat belts cannot be pulled out in a locked condition, pull the belt once forcefully and then return it.
After that, pull the belt out slowly once again.
2. After making sure that the seat belt is not twisted, insert the latch plate (B) into the buckle (C) aligning the marks (D) on the plate and buckle until a “click” is heard.
![]() WARNING
WARNING
• When using the seat belt, make sure to securely connect the latch plate (B) with the buckle (C). Failing to do so could significantly reduce the amount of protection and cause serious injures in a collision or a sudden stop.
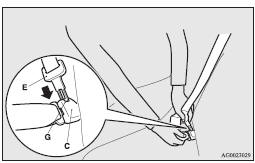
3. Insert the latch plate (E) into the buckle (F) until a “click” is heard.
4. Make sure the lap belt is positioned as low as possible on the hips and pull the shoulder belt to adjust the slackness of the lap belt.
To unfasten
1. Hold the latch plate (E) and push the button on the buckle (F).
2. Push the button (G) on the buckle (C) using the latch plate (E) to disconnect the seat belt from the buckle.
3. Retract the seat belt and remove it from the seat belt guide (A).
4. After the seat belt is retracted completely, insert the latch plate (E) into the upper slit (H) and the latch plate (B) into the lower slit (I).
See also:
Filling the fuel tank
WARNING
Gasoline is highly flammable and explosive. You could be burned or seriously
injured when handling it. When refueling your vehicle, always turn the engine off
and keep away from flames, s ...
Driver’s seat belt warning lamp and display
Warning lamp
A tone and warning lamp are used to remind the driver to fasten the seat belt.
If the ignition switch is turned to the “ON” position or the operation mode is
put in ON while a ...
Interrupt display screen (when the ignition switch or the operation mode is
OFF)
When there is information to be announced, such as lamp reminders, the buzzer
sounds and the multiinformation display switches to the warning display screen.
Refer to the appropriate page and take ...