
Display unit selection
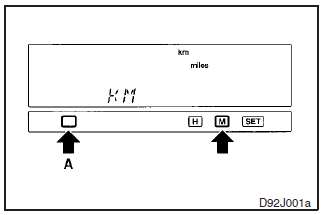
Originally, km/h and L/100 km are selected. When you want to select the unit “mile”, follow this procedure.
NOTE
For vehicles without MITSUBISHI genuine audio system, only the unit of average fuel consumption can be changed to km or miles as you like.
1. Press the “M” button while pressing the button (A) to activate the display unit selection function. The currently selected unit will appear.
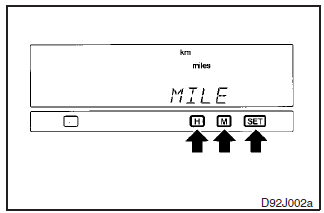
2. Use the “H” or “M” button to select the desired speed unit, then press the “SET” button to enter the setting.
H- km
M- mile
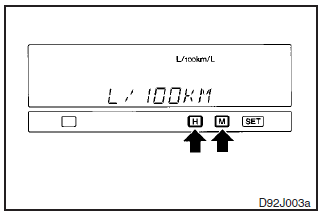
3. If the km unit was selected in step 2, the fuel consumption unit must be selected continuously using the “H” or “M” button. The currently selected unit will appear.
Use the “H” or “M” button to select the desired fuel consumption unit, then press the “SET” button to enter the setting.
H- L/100 km
M- km/L
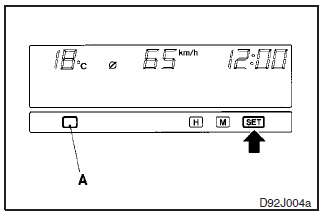
4. Press the “SET” button to determine the setting. The display will return to the original display item.
NOTE
(1) For vehicles without a MITSUBISHI genuine audio system, only the unit
of fuel consumption can be changed to km or miles as you like.
(2) If you select
“M” (mile) unit in step 2, fuel consumption is automatically shown in “mpg (mile
per gallon)”.
(3) To cancel the unit setting procedure before completion, press
the button (A).
(4) The outside temperature and clock are not shown during the
unit selecting procedure.
(5) If the “SET” button is not pressed for about 15
seconds or longer in the middle of the selection, the currently selected unit is
set automatically. Then, the display returns to the original display item.
See also:
Auto mode
(MITSUBISHI genuine audio only)
The automatic adjustment mode can set the local time automatically by using the
signal from the local RDS stations. In this mode, “CT” (A) (Clock Time: sent with ...
Bluetooth® device control panel and display
1- CD (Mode change) button
2- PWR (On-Off) button
3- PAGE (Title scroll) button
4- DISP (Title display) button
5- RPT (Repeat) button
6- RDM (Random) button
7- DISC DOWN (Pause/Stop) button
...
To reduce the glare
Type 1
The lever (A) at the bottom of the mirror can be used to adjust the mirror to
reduce the glare from the headlamps of vehicles behind you during night driving.
1- Normal
2- Anti-glare
Ty ...