If a tyre is punctured
If a tyre must be changed due to a puncture, do so only after first following every precaution for safety: parking the vehicle in a place where it is not a traffic hazard or dangerous to you and your vehicle’s occupants, on a flat surface.
1. Comply with local regulations concerning the protection of broken-down vehicle by switching on the hazard warning flashers, setting up a warning triangle, flashing signal lamp, etc., at an adequate distance from the vehicle. Have all passengers leave the vehicle.
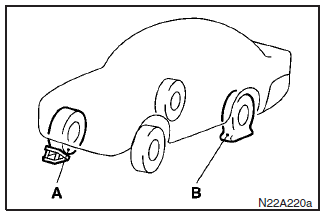
2. Park the vehicle on a flat, hard surface and apply the parking brake. To prevent the vehicle from rolling when it is raised on the jack, chock the wheel (A) diagonally opposite to that being changed (B).
CAUTION
Be sure to apply a chock to the relevant tyre when jacking up the vehicle. If the vehicle moved while jacked up, the jack could slip out of position, leading to an accident.
NOTE
(1) The chock shown in the illustration is not supplied with the vehicle. It
is recommended one be obtained and carried for use if required.
(2) If a chock
is not available, use a stone or any other object that is large enough to hold the
wheel in position.
3. Get the spare wheel, jack and wheel nut wrench ready.
NOTE
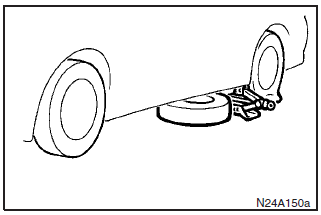
Place the spare wheel under the vehicle body near the jack; this helps to minimize danger should the jack slip out of position.
4. If the vehicle has wheel covers, remove the wheel covers (Refer to the section
entitled “Wheel covers”) and loosen the wheel nuts with the wheel nut wrench. Do
not remove the wheel nuts at this stage.
5. Refer to the section entitled “Jacking
up the vehicle” to select a jacking point near the flat tyre at which to position
the jack and then raise the vehicle until the tyre is slightly off the ground.
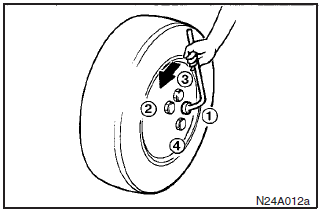
6. Remove the wheel nuts with the wheel nut wrench or by hand, then remove the wheel.
7. Place the spare wheel and then install the wheel nuts with the tapered ends facing inward, then tighten by hand until the wheel is no longer loose.
NOTE
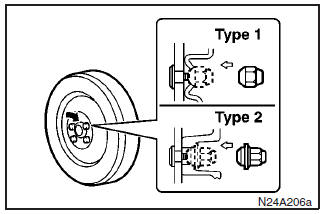
(1) Flange nuts (2) can be temporarily used on the steel wheel, but return
to the original wheel and tyre as soon as possible.
(2) If all four wheels on
vehicles with flange nuts (2) are changed to steel wheels, use tapered nuts (1).
CAUTION
Never apply oil to either wheel bolts or nuts as it will cause them to overtighten.
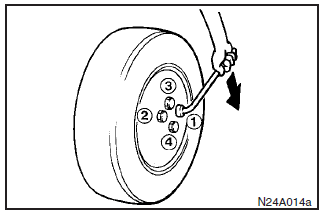
8. Lower the vehicle slowly and then tighten the nuts diagonally in two or three steps until each nut has been tightened to the specified torque.
Tightening torque:
98 to 117 Nm
(Achieved by applying force of approx. 390 to 450N at end of wheel
nut wrench supplied with vehicle)
CAUTION
Never use extra force with your foot on the wheel nut wrench or by using a pipe extension as you can overtighten the nut.
9. Lower and remove the jack and stow the jack, bar, wheel nut wrench and flat tyre wheel. Have the flat tyre repaired as soon as possible.
10. Check tyre inflation pressure. The inflation pressure specification is shown on the label. See illustration.
CAUTION
(1) Compact spare tyre is used temporarily when the standard tyre flows out.
Repair the flown tyre as soon as possible to replace the compact spare tyre with
the standard tyre.
(2) After changing the tyre, drive the vehicle approximately
1000 km and retighten the wheel nuts to make sure that they are not loose.
(3)
If the steering wheel vibrates when driving after change of the tyre, have the tyre
checked for balance at your MITSUBISHI dealer.
(4) For the safe operation of your
vehicle, make sure you avoid mixing one type of with another or using tyres other
than the specified size.
See also:
Ignition switch
To prevent vehicle theft, only the emergency key with the preregistered keyless
operation key inserted can start the engine. (Electronic immobilizer function) Also
refer to “Starting and driving ...
Control panel
A- Temperature control dial
B- Air selection switch
C- Blower speed selection dial
D- Air conditioning switch
E- Mode selection dial
F- Rear window demister switch
Blower speed selection dial
...
Warning display list (when the ignition switch is “OFF”)
...