Automatic transmission fluid
The proper amount of automatic transmission fluid is essential to the life and operation of the automatic transmission. Either insufficient fluid or excessive fluid could cause transmission trouble. The transmission fluid filler port cap is equipped with a dipstick. Use the following procedure to check the fluid level.
1. Check the fluid level after the vehicle has been driven enough to warm up
the transmission fluid.
2. Park the vehicle on a flat, level surface and apply
the parking brake.
3. With the engine idling and the brake pedal fully depressed,
move the transmission selector lever through all the positions from the ”P” (PARK)
to ”L” (LOW) (with INVECS–II 4A/T), the ”P” (PARK) to ”D” (DRIVE) (with INVECS–
II Sports Mode 4A/T), stopping momentarily at each position.
4. Move the selector
lever to the ”N” (NEUTRAL) or ”P” (PARK) position.
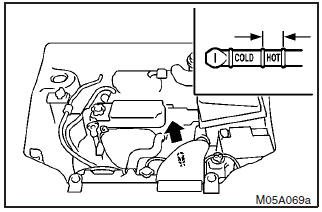
5. Remove the dipstick and
wipe it with a clean lint–free cloth.
6. Reinsert the dipstick as far as it goes.
7. Remove the dipstick and read the oil level. The fluid level should always be
between the two marks on the dipstick.
8. Use only the following transmission
fluid to ensure optimum transmission performance: ”DIA QUEEN ATF SP III”.
WARNING
Do not spill the fluid onto a hot exhaust manifold during topping up or inspection, or a fire may occur.
See also:
USB input terminal
You can connect your USB memory device or iPod to play music files stored in
the USB memory device or iPod.
The following explains how to connect and remove a USB memory device or iPod.
Refer to t ...
Outside temperature display screen
This shows the temperature outside the vehicle.
Note
► The display setting can be changed to the preferred units (°C or °F).
Refer to “Changing the function settings (when the ignition ...
Licence plate lamps
Remove the lens mounting screws, remove the lens, then remove the bulb by pulling
out. ...