Rear room lamp
When replacing the bulb, put the rear room lamp switch into the “OFF” position.
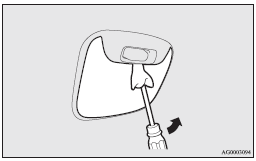
1. Insert a straight blade (or minus) screwdriver with a cloth over its tip into the notch of the lamp assembly and pry gently to remove the lens.
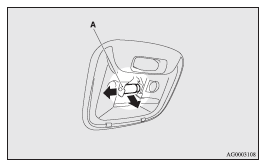
2. While holding down the tab (A), pull out the bulb.
3. To install the bulb, perform the removal steps in reverse.
![]() Note
Note
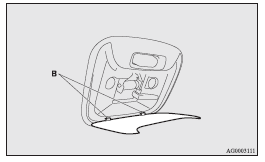
► When mounting the lens, align the tabs (B) with the holes on the vehicle body.
See also:
When turning from “ACC” to “LOCK”
[Vehicles equipped with M/T] Put the gearshift lever into the “N” (Neutral) position,
and slowly turn the ignition switch to the “LOCK” position while pressing it.
[Vehicles equipped with C ...
Activation
The Auto Stop & Go (AS&G) system is automatically activated when the ignition
switch is turned to the “ON” position. ...
Seat belts
To protect you and your passengers in the event of an accident, it is the most
important that the seat belts are worn correctly when you drive.
The front seat belts have pre–tensioners. These bel ...