Heater/Manual air conditioning*
The heater and the air conditioning can be operated while the engine is running. The performance of the heater is directly related to the temperature of the engine coolant, so operate the heater after the engine has had a chance to warm up. The amount of air flow can be regulated by adjusting the blower speed.
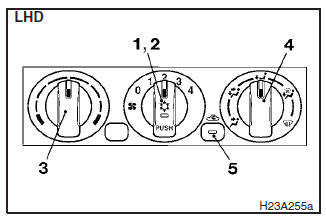
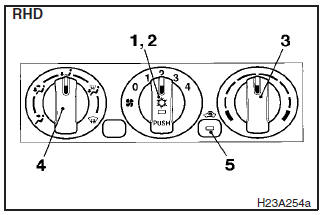
1- Air conditioning switch*
Push the switch when the fan is switched on, and the air conditioning unit (cooling/dehumidifying function) will operate, turning the operation indicator lamp on.
Push the switch again, and the air conditioning unit will stop.
NOTE
On an air conditioned vehicle, the cool air from the ventilators may appear as a mist. This is due to moist air being suddenly cooled by the air conditioning. This will clear after a few moments.
CAUTION
When using the air conditioning, the idling speed may slightly increase as the air conditioning compressor is switched on/off automatically. Especially for vehicles with an automatic transmission, while the vehicle is stationary, fully depress the brake pedal to prevent the vehicle from creeping.
2- Blower speed selection dial There are 4 blower speeds for control of the amount of air flow. Adjust the blower speed by turning the blower speed selection dial clockwise or anticlockwise. The setting for ordinary use should be the first or second speed.
3- Temperature control dial The heater will not operate if the dial is set all the way to the left. The air flow temperature will gradually increase as the dial is turned to the right.
NOTE
When the engine coolant temperature is low, temperature of air introduced into the passenger compartment does not change even if the temperature control dial is moved to the high temperature side.
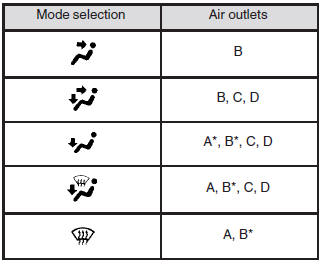
A: From front and side demister
B: From centre and side ventilators
C: From
under the instrument panel
D: From under the front seat
4- Mode selection dial
Main flow directions:
 (Face position)
Air flows to the upper part of the passenger compartment.
 (Foot/face position)
Air flows to the upper part of the passenger compartment, and the leg area.
 (Foot position)
Air flows to the leg areas.
 (Foot/demister position)
Air flows to the leg areas, windscreen door windows.
 (Demister position)
Air flows to the windscreen and the door windows.
NOTE
Air always flows out from the centre and side ventilators regardless of the mode selection dial position.
5- Air selection switch
Every time the switch is pressed, alteration is made between outside air introduction and inside air recirculation.
When inside air is recirculated, the indicator lamp comes on.
(Outside position)
Outside air is introduced into the passenger compartment.
(Recirculation position)
Air is recirculated inside the passenger compartment.
NOTE
Normally, use the outside position to keep the windscreen and side windows clear and quickly remove fog or frost from the windscreen.
If high cooling performance is desired or if the outside air is dusty or otherwise contaminated, use the recirculation position. But in this case, switch to the outside position periodically to ventilate so that the window does not become fogged up.
CAUTION
Use of the recirculation position for extended time causes the windows to fog up.
See also:
Vehicle care
In order to maintain the value of your vehicle, it is necessary to perform regular
maintenance using the proper procedures. Always maintain your vehicle in compliance
with any environmental pollut ...
Stopping the engine
1. Bring the vehicle to a complete stop.
2. Fully engage the parking brake while depressing the brake pedal.
3. For vehicles equipped with M/T, turn the ignition switch to the “LOCK” position
...
To remove the spare tyre
1. Lift up the board.
2. To remove the spare tyre, remove the installation clamp (A) by turning it anticlockwise.
Note
► Put the spare wheel under the vehicle body near the jack. This make ...