Procedure for replacing the remote control switch battery
1. Before replacing the battery, remove static electricity from your body by
touching a metal grounded object.
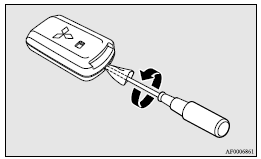
2. With the MITSUBISHI mark facing you, insert the cloth-covered tip of a straight
blade (or minus) screwdriver into the notch in the case and use it to open the case.
![]() Note
Note
► Be sure to perform the procedure with the MITSUBISHI mark facing you. If the MITSUBISHI mark is not facing you when you open the case, the transmitter may come out.
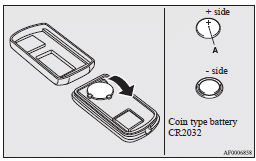
3. Remove the old battery.
4. Install a new battery with the + side (A) up.
5. Close the case firmly.
6. Check the keyless operation function to see that it works.
![]() Note
Note
► You may purchase a replacement battery at an electric appliance store.
► A MITSUBISHI MOTORS Authorized Service Point can replace the battery for you if
you prefer.
![]() Caution
Caution
► When the remote control switch case is opened, be careful to keep water, dust, etc. out. Also, do not touch the internal components.
See also:
Meter, gauge and indication/ warning lamp operation
Run the engine to check the operation of all meters, gauges, and indication/warning
lamps.
If there is anything wrong, take the vehicle to an authorized MITSUBISHI dealer
for inspection. ...
Tether anchorage locations
There are 2 child restraint anchorage points located on the back of the seatbacks.
These are for fastening the child restraint tether straps to the 2 rear seat seating
positions.
Warning
` ...
Control panel
A- Temperature control dial
B- Air selection switch
C- Blower speed selection dial
D- Air conditioning switch
E- Mode selection dial
F- Rear window demister switch
Note
► There is an i ...