Changing the display language
The language of the multi-information display can be switched.
1. Press and hold the multi-information meter switch for about 2 seconds or more to switch from the setting mode screen to the menu screen.
Refer to “Changing the function settings (when the ignition switch is “ON”)”.
2. Lightly press the multi-information meter switch to select “LANGUAGE” (language setting).
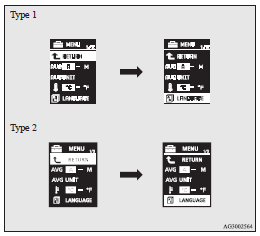
3. Press and hold the multi-information meter switch for about 2 seconds or more
to display “LANGUAGE” (language setting).
4. Lightly press the multi-information meter switch to select the desired language.
5. If you hold down the multi-information meter switch for about 2 seconds or more,
the setting is changed to the selected language.
![]() Note
Note
► The memory of the language setting is erased if the battery is disconnected,
and it returns automatically to ENGLISH or RUSSIAN.
► If “---” is selected in the language setting, a warning message is not displayed
when there is a warning display or interrupt display.
See also:
Bonnet
To open
Pull the release lever towards you to unlock the bonnet.
Raise the bonnet while pressing the safety lock.
NOTE Only open the bonnet when the wipers are in the parked position. Failure
...
Seat belt pretensioner system and force limiter system
The driver’s seat and front passenger’s seat each have a seat belt equipped with
a pretensioner system. ...
Ignition switch ON reminder system
When the engine was started using the keyless operation function
If the driver’s door is opened with the ignition switch in any position other
than “LOCK” (PUSH OFF) after turning off the e ...