Welcome light (for vehicles equipped with the keyless entry system or the keyless
operation system)
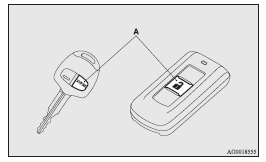
Except for vehicles for Russia, Kazakhstan and Ukraine, this function turns on the position and tail lamps for about 30 seconds after the UNLOCK switch (A) on the remote control transmitter is pressed when the combination headlamps and dipper switch is in the “OFF” or “AUTO” position (for vehicles equipped with the automatic lamp control).
On vehicles equipped with automatic lamp control, the welcome light function will operate only when it is dark outside the vehicle.
![]() Note
Note
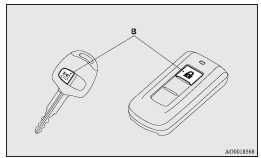
► While the welcome light function is operating, perform one of the following
operations to cancel the function.
• Push the LOCK switch (B) on the remote control transmitter.
• Turn the combination headlamps and dipper switch to the
 position.
• Turn the ignition switch to the “ON” position.
► It is possible to modify functions as follows:
• Except for vehicles for Russia, Kazakhstan and Ukraine, deactivating the welcome
light function.
• Vehicles for Russia, Kazakhstan and Ukraine, activating the welcome light function.
• The headlamps can be set to come on in the low beam setting.
For further information, we recommend you to consult a MITSUBISHI MOTORS Authorized
Service Point.
On vehicles equipped with MITSUBISHI Multi-Communication System (MMCS), screen operations
can be used to make the adjustment. Refer to the separate owner’s manual for details.
See also:
Head restraints
Warning
► Driving without the head restraints in place can cause you and your passengers
serious injury or death in an accident. To reduce the risk of injury in an accident,
always make su ...
ACD control mode display
Example: “TARMAC” mode is selected.
The currently selected control mode is displayed on the multi-information display.
In addition, when the control mode is changed, the selected mode appears ...
Windscreen wipers
NOTE
• To ensure a clear rearward view, the rear window wiper will automatically perform
several continuous operations if the gearshift lever or the selector lever is put
in the “R” positi ...