Reference lines on the screen
Reference lines and upper surface of the rear bumper (A) are displayed on the screen.
► Red line (B) indicates approximately 50 cm behind the rear bumper.
► Two Green lines (C) indicate approximately 20 cm outside of the vehicle body.
► Short transverse lines (1 to 3) indicate distance from the rear bumper.
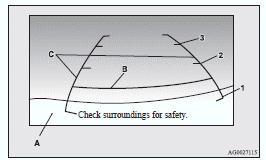
1- Approximately at the rear edge of the rear bumper
2- Approximately 100 cm
3- Approximately 200 cm
![]() Note
Note
► When the vehicle is tilting because of the number of people in the vehicle,
the weight and positioning of luggage, and/or the condition of the road surface,
the lines in the view from the rear-view camera may not be accurately positioned
relative to the actual road.
The reference lines for distance and vehicle width are based on a level, flat road
surface.
In the following cases, objects shown on the screen will appear to be farther off
then they actually are.
• When the rear of the vehicle is weighed down with the weight of passengers and luggage in the vehicle.
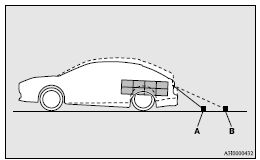
A- Actual objects
B- Objects shown on the screen
• When there is an upward slope at the back.
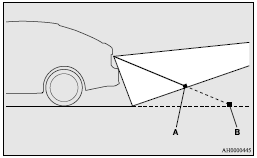
A- Actual objects
B- Objects shown on the screen
► The reference lines for distance and vehicle width are intended to indicate the distance to a flat object such as a level, flat road surface.
This may make the distance to a projecting object shown on the screen differ from the actual distance to the projecting object. Do not use them as a guide for distances to solid objects.
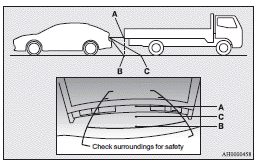
Example: On the screen the point B appears the nearest, then the point C and A in order of distance. The points A and B actually are the same distances from the vehicle, and the point C is farther off than the points A and B.
See also:
Spot lamps
Insert a straight blade (or minus) screwdriver into the notch of the lamp assembly
and pry gently to remove the lens.
Remove the bulb from the lamp holder.
NOTE
Wrap a piece of cloth around the ...
Setting of door and rear hatch unlock function (vehicles equipped with the central
door lock switch)
The door and rear hatch unlock function can be set to the following two conditions.
Each time the door and rear hatch unlock function is set, a chime will sound
to tell you the condition of the doo ...
Meter, gauge and indication/ warning lamp operation
Run the engine to check the operation of all meters, gauges, and indication/warning
lamps.
If there is anything wrong, take the vehicle to an authorized MITSUBISHI dealer
for inspection. ...