How to change a tyre
Before changing a tyre, first stop your vehicle in a safe, flat location.
1. Park the vehicle on level and stable ground, free of loose pebbles, etc.
2. Set the parking brake firmly.
3. On vehicles with M/T, turn the ignition switch to the “LOCK” position, move the gearshift lever to the “R” (Reverse) position.
On vehicles with CVT or Twin Clutch SST, move the selector lever (CVT) or gearshift lever (Twin Clutch SST) to the “P” (PARK) position, turn the ignition switch to the “LOCK” position.
4. Turn on the hazard warning flashers and set up a warning triangle, flashing signal lamp, etc., at an adequate distance from the vehicle, and have all your passengers leave the vehicle.
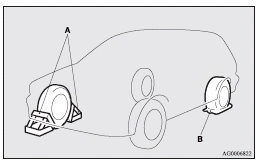
5. To prevent the vehicle from rolling when it is raised on the jack, place chocks or blocks (A) at the tyre that is diagonally opposite from the tyre (B) you are changing.
![]() Warning
Warning
► Be sure to apply chocks or blocks to the correct tyre when jacking up the
vehicle.
If the vehicle moves while jacked up, the jack could slip out of position, leading
to an accident.
![]() Note
Note
► The chocks shown in the illustration do not come with your vehicle. It is recommended
that you keep one in the vehicle for use if needed.
► If chocks or blocks are not available, use stones or any other objects that are
large enough to hold the wheel in position.
6. Get the jack bar and wheel nut wrench ready.
Refer to “Tools and jack”.
See also:
Inside rear-view mirror
The lever (A) at the bottom of the mirror can be used to adjust the mirror to
reduce the glare from the headlamps of vehicles behind you during night driving.
1- Normal 2- Anti-glare
WARNING
Do ...
Engine overheating
When the engine is overheating, the information screen in the multi-information
display will be interrupted and the engine coolant temperature warning display will
appear. Also will blink.
If th ...
How to enter PTYs in the memory
As many as 6 PTYs can be entered in the memory.
Follow the steps described below.
1. Press either the TUNE/SEEK button (5 or 6) to tune the PTY to be entered in
the memory. 2. Press one of the mem ...