Manual mode
The manual mode is also available in case the automatic mode shows the incorrect time when the adjacent local RDS stations are located in a different time zone. Refer to “Radio data system (RDS)” on pages 5-22, 5-36.
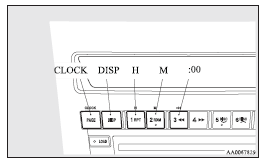
Set the time by pressing the various buttons as described below.
1. Keep the CLOCK button pressed until the time display flashes.
2. Press the appropriate buttons to adjust the time.
“H” button - To adjust the hour
“M” button - To adjust the minutes
“:00” button - To reset the minutes to zero
10:00 - 10:29......Changes to 10:00
10:30 - 10:59......Changes to 11:00
3. Once the time is set, press the “DISP” button, and the time display will stop flashing.
When a time adjustment has been made, the flashing stops automatically.
![]() Note
Note
► If the battery cables are disconnected during repairs or for any other reason,
reset the clock to the correct time after they are reconnected.
► The digital clock does not have a second display.
When the “minute” display is adjusted and reset to zero, the clock begins at zero
seconds for the selected minute.
See also:
Genuine parts
Don’t play around with substitutes.
MITSUBISHI has gone to great lengths to bring you a superbly crafted vehicle
offering the highest quality and dependability. Don’t reduce that quality and de ...
SRS servicing
The entire SRS including air bag and pretensioner seat belt must be inspected
by an authorized MITSUBISHI dealer after 10 years.
WARNING
(1) Any maintenance performed on or near the components of ...
Caution for installing the child restraint on vehicle with front passenger air
bag
The label shown here is attached on vehicles with front passenger air bag. If
this label is attached, never install the rearfacing child restraint on the front
passenger’s seat.
WARNING
(1 ...