To change a tyre
1. If a wheel cover is installed, first remove the cover. (Refer to “Wheel covers”.) Then loosen the wheel nuts a quarter turn with the wheel nut wrench. Do not remove the wheel nuts yet.
2. Place the jack under one of the jacking points (A) shown in the illustration. Use the jacking point closest to the tyre you wish to change.
![]() WARNING
WARNING
• Set the jack only at the positions shown here. If the jack is set at a wrong position, it could dent your vehicle or the jack might fall over and cause personal injury.
• Do not use the jack on a tilted or soft surface.
Otherwise, the jack might slip and cause personal injury. Always use the jack on a flat, hard surface.
Before setting the jack, make sure there are no sand or pebbles under the jack base.
3. Rotate the jack by hand until the flange portion (B) fits in the groove (C) at the top of the jack.

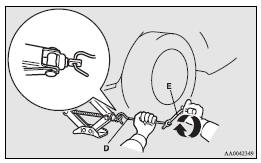
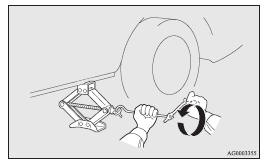
4. Insert the jack bar (D) into the wheel nut wrench (E).
Then put the end of the jack bar into the shaft’s jack end, as shown in the illustration.
Slowly rotate the wheel nut wrench until the tyre is raised slightly off the ground surface.
![]() WARNING
WARNING
• Stop jacking up the vehicle as soon as the tyre is raised off the ground.
It is dangerous to raise the vehicle any higher.
• Do not get under your vehicle while using the jack.
• Do not bump the raised vehicle or leave it sitting on the jack for a long time.
Both are very dangerous.
• Do not use a jack except the one that came with your vehicle.
• The jack should not be used for any purpose other than to change a tyre.
• No one should be in your vehicle when using the jack.
• Do not start or run the engine while your vehicle is on the jack.
• Do not turn the raised wheel. The tyres still on the ground could turn and
make your vehicle fall off the jack.
5. Remove the wheel nuts with the wheel nut wrench, then take the wheel off.
![]() CAUTION
CAUTION
• Handle the wheel carefully when changing the tyre, to avoid scratching the wheel surface.
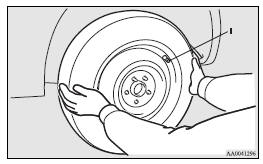
6. Clean out any mud, etc. on the hub surface (F), hub bolts (G) or in the installation holes (H) in the wheel, and then mount the spare tyre.
![]() WARNING
WARNING
• Be sure to position the tyres the correct way when putting them on the vehicle.
The valves should be on the outer side of the vehicle. If the valve (I) cannot be seen, the tyre has been mounted the wrong way around.
If tyres are mounted the wrong way around it could have a negative effect on the vehicle and cause an accident.
7. Turn the wheel nuts clockwise by hand to initially tighten them.
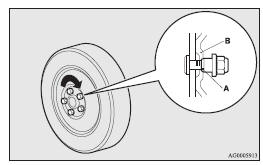
[Vehicle with the tapered nuts]
Initially tighten the wheel nuts until the tapered part (A) of the nuts lightly touches the wheel hole seats (B) enough to keep the tyre from wobbling.
![[Vehicle with the flange nuts]](images/books/1247/12/index.86.jpg)
[Vehicle with the flange nuts]
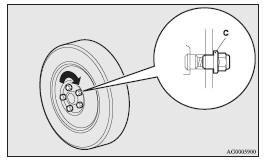
• Aluminium wheel
Initially tighten the wheel nuts until the wheel nut flange area (C) touches the wheel enough to keep the tyre from wobbling.
• Steel wheel
Initially tighten the wheel nuts until the tapered area (A) of the nuts lightly touches the wheel hole seat area (B) enough to keep the tyre from wobbling.
![]() CAUTION
CAUTION
• Never apply oil to either the wheel bolts or the nuts, or they will tighten too much.
![]() NOTE
NOTE
• Flange nuts can be temporarily used on the steel wheel, but return to the original wheel and tyre as soon as possible.
• If all 4 aluminium wheels are changed to steel wheels, e.g. when fitting winter tyres, use tapered nuts.
8. Lower the vehicle slowly by rotating the wheel nut wrench anticlockwise until the tyre touches the ground.
9. Tighten the nuts in the order shown in the illustration until each nut has been tightened to the torque listed here.
Tightening torque 88 to 108 Nm (Achieved by applying force of 350 to 420 N at end of wheel nut wrench supplied with vehicle)
![]() CAUTION
CAUTION
• Never use your foot or a pipe extension for extra force in the wheel nut wrench.
If you do so, you will tighten the nut too much.
10. If the vehicle has a wheel cover, install it.
Refer to “Wheel covers”.
11. Lower and remove the jack, then store the jack, flat tyre, and chocks. Have your damaged tyre repaired as soon as possible.
12. Check your tyre inflation pressure at the next gasstation.
The correct tyre pressures are shown on the driver’s door label. See the illustration.
![]() CAUTION
CAUTION
• The temporary spare wheel is to be used only temporarily when the standard wheel is damaged. Repair the damaged tyre as soon as possible and use it to replace the temporary spare tyre.
• After changing the tyre and driving the vehicle about 1,000 km (620 miles), retighten the wheel nuts to make sure that they have not come loose.
• If the steering wheel vibrates when driving after changing the tyre, we recommend you to have the tyres checked for balance.
• Do not mix one type of tyre with another or use a different size from the one listed.
This would cause early wear and poor handling.
See also:
Range of view of rear-view camera
The range of view of the rear-view camera is limited to the area shown in the
illustrations. It cannot show both sides and the lower part of the rear bumper,
etc.
When reversing, be sure to visua ...
Assist grips
The assist grips (located above the doors on the headliner) are not designed
to support body weight.
They are intended for use only while seated in the vehicle.
CAUTION
• Do not use the assi ...
Front room & map lamps
1 (DOOR) - The lamp illuminates when a door or the rear hatch is opened. It goes
off about 15 seconds after the door or rear hatch is closed. However, the lamp goes
off immediately in the follow ...