How to change a tyre
Before changing a tyre, first stop your vehicle in a safe, flat location.
1. Park the vehicle on level and stable ground, free of loose pebbles, etc.
2. Set the parking brake firmly.
3. On vehicles with M/T, stop the engine and move the gearshift lever to the
“R” (Reverse) position.
On vehicles with CVT, move the selector lever to the “P” (PARK) position and stop the engine.
4. Turn on the hazard warning flashers and set up a warning triangle, flashing signal lamp, etc., at an adequate distance from the vehicle, and have all your passengers leave the vehicle.
![]() NOTE
NOTE
• The warning triangle and flashing signal lamp do not come with your vehicle. It is recommended that you keep one in the vehicle for use if needed.
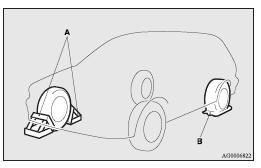
5. To prevent the vehicle from rolling when it is raised on the jack, place chocks or blocks (A) in front of and behind the tyre that is diagonally opposite from the tyre (B) you are changing.
![]() WARNING
WARNING
• Be sure to apply chocks or blocks to the correct tyre when jacking up the vehicle.
If the vehicle moves while jacked up, the jack could slip out of position, leading to an accident.
![]() NOTE
NOTE
• The chocks shown in the illustration do not come with your vehicle. It is recommended that you keep one in the vehicle for use if needed.
• If chocks or blocks are not available, use stones or any other objects that are large enough to hold the wheel in position.
6. Get the jack bar and wheel nut wrench ready.
Refer to “Tools, jack and tyre repair kit”.
See also:
Error codes (iPod)
If an error code appears in the display, take action in accordance with the table
below.
...
How to make or receive hands-free calls
You can make or receive hands-free calls using a Bluetooth® compatible cellular
phone connected to the Bluetooth® 2.0 interface.
You can also use the phone books in the Bluetooth ® 2.0 interface ...
To listen to a CD [With a CD player]
1. Insert the disc with the label facing upward. When a disc is inserted, the
CD player will begin playing even if the radio or tape player is being used. The
CD player will also start the playbac ...