Changing the display language
The language of the multi-information display can be switched.
1. Press and hold the multi-information meter switch for about 2 seconds or more to switch from the setting mode screen to the menu screen.
Refer to “Changing the function settings (when the ignition switch is “ON”)”.
2. Lightly press the multi-information meter switch to select “LANGUAGE” (language setting).
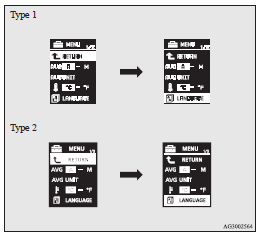
3. Press and hold the multi-information meter switch for about 2 seconds or more
to display “LANGUAGE” (language setting).
4. Lightly press the multi-information meter switch to select the desired language.
5. If you hold down the multi-information meter switch for about 2 seconds or more,
the setting is changed to the selected language.
![]() Note
Note
► The memory of the language setting is erased if the battery is disconnected,
and it returns automatically to ENGLISH or RUSSIAN.
► If “---” is selected in the language setting, a warning message is not displayed
when there is a warning display or interrupt display.
See also:
USB control panel and display
1- AM/FM button
2- CD (Mode change) button
3- PWR (On-Off) button
4- PAGE (Title scroll) button
5- DISP (Title display) button
6- RPT (Repeat) button
7- RDM (Random) button
8- (Fast-revers ...
To turn from “ACC” to “LOCK”
1. [Vehicles equipped with M/T]
Push the emergency key in at the “ACC” position and keep it depressed until it is
turned to the “LOCK” position, and remove it.
[Vehicles equipped with CVT ...
Braking
All the parts of the brake system are critical to safety.
We recommend you to have the vehicle checked at regular intervals according to
the service booklet.
Caution
► Avoid driving habits ...