
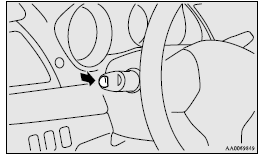
Headlamp washer switch
The headlamp washer can be operated when the ignition switch is in the “ON” or “ACC” position and the headlamps are on.
Push the button once and the washer fluid will be sprayed on to the headlamps.
 Note
Note
► If the ignition switch is in the “ON” or “ACC” position and the headlamps are on, the headlamp washer operates together with the windscreen washer the first time the windscreen washer lever is pulled.
Precautions to observe when using wipers and washers
► If the moving wipers become blocked by ice or other deposits on the glass, the motor may burn out even if the wiper switch is turned to OFF. If obstruction occurs, park your vehicle in a safe place, turn off the ignition, and clean the deposits from the glass so that the wipers operate smoothly.
► Do not use the wipers when the glass is dry.
They may scratch the glass surface and the blades wear out prematurely.
► Before using the wipers in cold weather, check that the wiper blades are not frozen onto the glass. The motor may burn out if the wipers are used with the blades frozen onto the glass.
► Avoid using the washer continuously for more than 20 seconds. Do not operate the washer when the fluid reservoir is empty.
Otherwise, the motor may burn out.
► Periodically check the level of washer fluid in the reservoir and refill if required.
During cold weather, add a recommended washer solution that will not freeze in the washer reservoir. Failure to do so could result in loss of washer function and frost damage to the system components.
See also:
Installing a child restraint system to a3-point type seat belt (with
emergency locking
mechanism)
3-point type seat belt location
The child restraint system can be fitted by using the 3-point type seat belt
at the below illustrated seating position.
Installation:
1. Fasten the seat belt to ...
Front passenger’s airbag ON-OFF switch
The front passenger’s airbag ON-OFF switch can be used to disable the front passenger’s
airbag. If you have a child restraint system that cannot be fitted to any seat other
than the front pass ...
Bending lamps (Adaptive Front lighting System (AFS)) (for vehicles equipped
with high intensity discharge headlamps)
1. When replacing the bulb on the right side of the vehicle, remove the bolt
(A) holding down the washer tank spout and move the spout towards the rear of the
vehicle.
: Front of the vehicle
2 ...