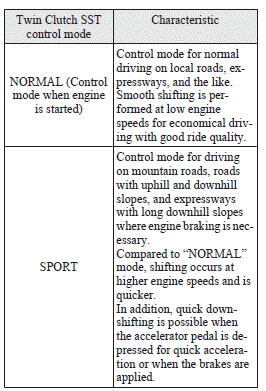
Twin Clutch SST control mode
Select the control mode from the following two types to suit the driving conditions.
![]() Note
Note
► When continuously driving on closed circuit tracks or at other locations where
the engine is operated at high speeds and under a heavy load, the Twin Clutch SST
fluid temperature will have a tendency to rise.
In this case, if the temperature rises too high, the
 warning display will appear on the
information screen in the multi-information display to alert the driver.
warning display will appear on the
information screen in the multi-information display to alert the driver.
If the warning display appears, be
sure to refer to “Warning display” and follow the appropriate measures.
► The Twin Clutch SST control mode can be selected both when “D” range operation
is selected and when manual shifting is selected.
► If you select “SPORT” mode while the engine is cold, the transmission may shift
up at different speeds compared to that when the engine is warm.
This is simply the operation of the control system to warm the engine quickly. It
does not indicate a malfunction.
► For slippery road surfaces, such as roads with accumulated snow, “NORMAL” mode
is recommended for smooth shifting at low engine speeds.
See also:
To listen to the radio
1- PWR (On-off) switch 2- VOL (Volume control) knob 3- U/M/L (UKW/MW/LW selection)
button 4- Audio adjust button 5- AUDIO button 6- TUNE/SEEK (Down-step/Down-seek)
button 7- TUNE/SEEK (Up-step/U ...
Diesel particulate filter (DPF)
The diesel particulate filter (DPF) is a device that captures most of the particulate
matter (PM) in the exhaust emissions of the diesel engine. The DPF automatically
burns away trapped PM during ...
For cold and snowy weather
Ventilation slots
The ventilation slots in front of the windscreen should be kept clear of leaves
or brushed clear after heavy snowfall, so that the operation of the heating and
ventilation syste ...