Digital clock
Automatic mode and manual mode is available for digital clock adjustment.
Select the automatic mode or the manual mode by performing the following operations:
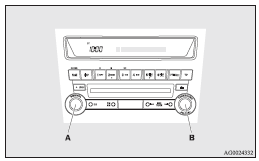
A- PWR switch
B- TUNE switch
1. Press the PWR switch (A) to turn ON the audio system.
2. Enter the function setup mode by pressing the TUNE switch (B) for 2 seconds
or longer.
3. Press the TUNE switch (B) repeatedly to select the CT (Clock Time) mode.
The order is: AF - CT - REG - TP-S - PI-S - Language of PTY display - SCV - PHONE - Function setup mode - OFF
(Refer to “Function setup mode”.)
![]() NOTE
NOTE
• Although “PHONE” appears on the display, the PHONE function is inoperative.
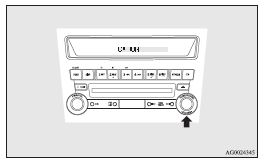
4. Turn the TUNE switch (B) left and right and select either ON or OFF.
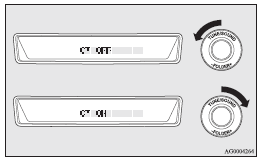
CT ON- Automatic mode
CT OFF- Manual mode
![]() NOTE
NOTE
• After selecting a mode, you can leave the function setup mode by taking either of the following steps:
• Press the TUNE switch (B) for at least 2 seconds.
• Make no entry for 10 seconds.
Automatic mode
The automatic adjustment mode can set the local time automatically by using the signal from local RDS stations. Refer to “Radio data system (RDS)”.
Manual mode
The manual mode is also available in case the automatic mode shows the incorrect time when the adjacent local RDS stations are located in a different time zone. Refer to “Radio data system (RDS)”.
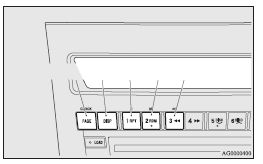
Set the time by pressing the various buttons as described below.
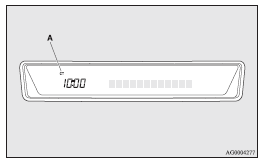
1. Keep the CLOCK button pressed until the time display flashes.
2. Press the appropriate buttons to adjust the time.
“H” button - To adjust the hour
“M” button - To adjust the minutes
“:00” button - To reset the minutes to zero
10:00 - 10:29...... Changes to 10:00
10:30 - 10:59...... Changes to 11:00
3. Once the time is set, press the “DISP” button, and the time display will stop flashing.
When a time adjustment has been made, the flashing stops automatically.
![]() NOTE
NOTE
• If the battery cables are disconnected during repairs or for any other reason, reset the clock to the correct time after they are reconnected.
• The digital clock does not have a second display.
When the “minute” display is adjusted and reset to zero, the clock begins at zero seconds for the selected minute.
See also:
After driving on icy roads
After driving on snow or icy roads, remove any snow and ice which may have accumulated
around the wheels. On vehicles that have an ABS, be careful not to damage the wheel
speed sensors (A) or the ...
Selection of engine oil (petrol-powered vehicle)
(1) Select engine oil of the proper SAE viscosity number according to the atmospheric
temperature. For 0W-30, 5W-30, 0W-40 and 5W-40 viscosity grade, use only ACEA A3
classification. (2) Use eng ...
iPod control panel and display
1- AM/FM button
2- CD (Mode change) button
3- PWR (On-Off) button
4- DISP (Title display) button
5- PAGE (Title scroll) button
6- RPT (Repeat) button
7- RDM (Random) button
8- ( ...