Rear room lamp
When replacing the bulb, put the rear room lamp switch into the “OFF” position.
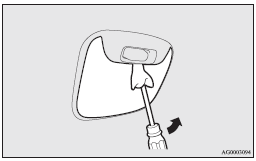
1. Insert a straight blade (or minus) screwdriver with a cloth over its tip into the notch of the lamp assembly and pry gently to remove the lens.
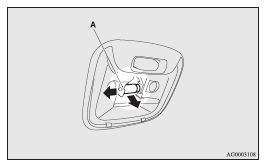
2. While holding down the tab (A), pull out the bulb.
3. To install the bulb, perform the removal steps in reverse.
![]() Note
Note
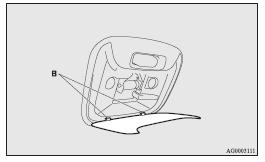
► When mounting the lens, align the tabs (B) with the holes on the vehicle body.
See also:
If the DPF warning display and check engine warning lamp illuminate at the same
time during vehicle operation
If an abnormal condition occurs in the DPF system, the DPF warning display and
check engine warning lamp illuminate. Have the system inspected at a MITSUBISHI
MOTORS Authorized Service Point.
...
Bonnet
To open
1. Pull the release lever towards you to unlock the bonnet.
2. Raise the bonnet while pressing the safety lock.
NOTE
• Only open the bonnet when the wipers are in the parked positio ...
To lock or unlock from outside the vehicle
Vehicles equipped with the key cylinder
1- Lock
2- Unlock ...