Wheel covers
To removeWrap the tip of the jack bar with a cloth, insert it deeply into the notch provided in the wheel cover, and pry the cover away from the wheel. Using the same procedure at the other wheel cover notches, work the wheel cover away from the wheel to remove it completely.
![]() CAUTION
CAUTION
• Removing the cover with your hands may cause injury to the fingers.
![]() NOTE
NOTE
• The wheel cover is made of plastic. Pry it loose carefully.
To install
1. Make sure the tabs (A) of the back of the wheel cover are not broken and correctly fitted on the rings (B). If in doubt, do not install the wheel cover and consult a MITSUBISHI MOTORS Authorized Service Point.
2. Align the tyre valve stem (C) with the cut out area (D) in the wheel cover.
![]() NOTE
NOTE
There is a symbol (E) on the back of the wheel cover indicating the cut out area.
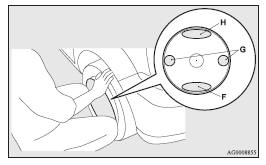
3. Push the underside (F) of the wheel cover into the wheel.
4. Gently push both sides (G) of the wheel cover and hold them in place with
both knees.
5. Gently push around the top (H) of the wheel cover.
See also:
Lock switch
When this switch is operated, the passenger’s switches cannot be used to open
or close the door windows and the driver’s switch cannot open or close any door
windows other than the driver’s ...
Damaged paint
Small cracks and scratches in the paint coat should be touched up as soon as
possible with MITSUBISHI touch-up paint to prevent corrosion.
Check body areas facing the road or the tyres carefully fo ...
Head restraints
Warning
► Driving without the head restraints in place can cause you and your passengers
serious injury or death in an accident. To reduce the risk of injury in an accident,
always make su ...