
Filling the fuel tank
WARNING
Gasoline is highly flammable and explosive. You could be burned or seriously injured when handling it. When refueling your vehicle, always turn the engine off and keep away from flames, sparks, and smoking materials. Always handle fuel in well–ventilated outdoor areas.
Fuel tank capacity
60 litres
Refueling
1. Before filling with fuel, stop the engine.
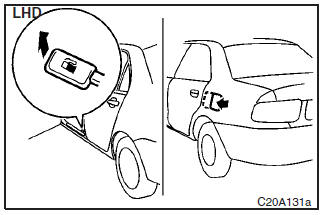
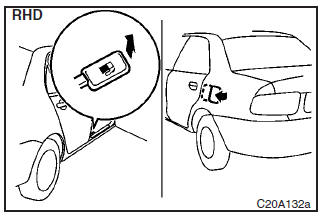
2. The fuel tank filler is located
on the left side of your vehicle.
The fuel tank filler door can be opened from
inside the vehicle with the fuel tank filler door release lever located beside the
driver’s seat.
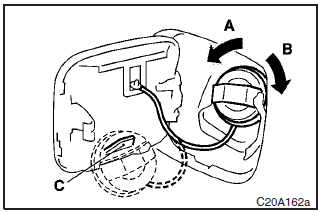
A- Remove
B- Close
3. Open the fuel tank filler tube by slowly turning the cap anticlockwise.
NOTE
Put the fuel tank cap on the cap holder (C) while refueling.
CAUTION
Since the fuel system may be under pressure, remove the fuel tank filler tube cap slowly. This relieves any pressure or vacuum that might have built up in the fuel tank. If the cap is venting vapor or if you hear a hissing sound, wait until it stops before removing the cap. Otherwise, fuel may spray out, injuring you or others.
4. To fill with fuel correctly depends mainly on correct handling of the fuel filler gun. Do not tilt the gun. Insert the gun in the tank port as far as it goes.
CAUTION
Petrol–powered vehicles have a label located on the fuel tank filler lid that states, ”UNLEADED FUEL ONLY”. The vehicle also has a fuel tank filler tube especially designed to accept the smaller diameter unleaded petrol dispensing nozzles only.
If the tank cap must be replaced, use only a MITSUBISHI original part specified for your vehicle.
5. When the gun stops automatically, remove the gun half the way in the tank port. After the second automatic stop, do not fill with fuel any more.
CAUTION
To avoid fuel spillage and overfilling, do not ”top–off” the fuel tank.
6. To close, turn the fuel tank filler tube cap slowly clockwise until you hear clicking sounds, then gently push the fuel tank filler door closed.
CAUTION
If you need replace the fuel tank filler tube cap, use only the cap specified for your model vehicle.
See also:
Auto reset mode
► When the average fuel consumption is being displayed, if you hold down the
multi-information meter switch, the average fuel consumption displayed at that time
is reset.
► If the ign ...
Manual reset mode
► When the average fuel consumption is being displayed, if you hold down the
multi-information meter switch, the average fuel consumption displayed at that time
is reset. ...
Tailgate
WARNING
• It is dangerous to drive with the tailgate open, since carbon monoxide (CO)
gas can enter the cabin.
You cannot see or smell CO. It can cause unconsciousness and even death.
• When ...