To listen to a tape
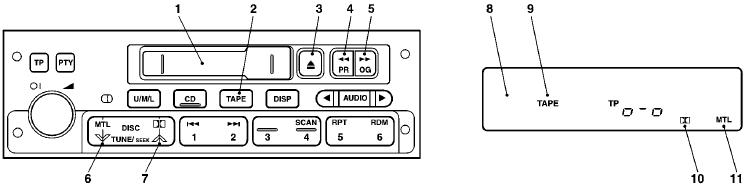
1- Cassette slot
2- TAPE button
3- Cassette eject button
4/5- PROG (Program
selector, Fast-forward/Fast-rewind) buttons
6- MTL (Tape selector) button
7-
 (Dolby noise reduction) button
8-
Tape travel display window
9- TAPE indicator
10-
 (Dolby noise reduction) indicator
11- MTL (Tape selector) indicator
1. After checking to be sure the tape in the cassette is wound tightly, push a cassette straight into the slot; the tape player will automatically start playing. When a cassette is inserted, the tape player will begin playing even if the radio is being used. The tape player will also start playing when the TAPE button (2) is pressed with a tape cassette in the player even if the radio is being used.
2. Press the (Dolby noise reduction)
button (7) when playing Dolby NR encoded tapes. The Dolby noise reduction circuitry
reduces tape hiss. The indicator illuminates when the circuit is activated. Pressing
the (Dolby noise reduction) button
a second time will switch off the Dolby system.
NOTE
Dolby noise reduction is manufactured under licence from Dolby Laboratories Licensing Corporation.
“DOLBY” and the Double-D symbol are trademarks of Dolby Laboratories Licensing Corporation.
3. When listening to a metal or chrome tape, press the MTL button (6). The indicator will illuminate when the button is pressed.
NOTE
Use this button only when listening to a metal or chrome tape.
4. To adjust the volume and tone, refer to the section “How to adjust the volume”,
and “How to adjust the tone” on page 6–5.
5. Press two PROG buttons (4 or 5) simultaneously.
The tape will then run opposite to its current direction, as shown by the display
(8). If the button is not pressed, the tape direction will change automatically
at the end of the tape.
6. Press the Cassette eject button (3); the tape will
automatically stop and the cassette will eject.
7. For information concerning
the handling of tape cassettes, refer to the section “Handling of cassette tapes”
on page 6–27.
See also:
Capacities
...
Fuel consumption
NOTE
• The results given do not express or imply any guarantee of the fuel consumption
your particular vehicle.
The vehicle itself has not been tested and there are inevitably differences bet ...
Filling the fuel tank
WARNING
Gasoline is highly flammable and explosive. You could be burned or seriously
injured when handling it. When refueling your vehicle, always turn the engine off
and keep away from flames, s ...