Operating the system as an automatic air conditioning
In normal conditions, use the system in the AUTO mode and follow these procedures:
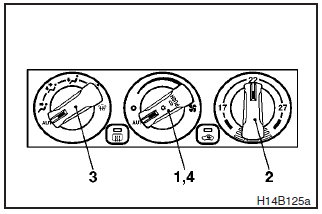
1- Set the blower speed selection dial to “AUT” position.
2- Turn the temperature control dial to set the desired temperature.
The temperature can be set within a range of 15 to 29.
The temperature will gradually increase as the dial is turned to the right.
NOTE
Set the temperature, under normal operating conditions, at around 22.
3- Set the mode selection dial to “AUT” position.
4- Push the air conditioning switch to operate the air conditioning. When the
air conditioning operates, the operation indicator lamp ( )
in the dial will come on.
)
in the dial will come on.
The outlet port (except “ ” and “
 ”),
recirculation/outside – air select and blower speed, and ON/OFF of air conditioning
will be controlled automatically.
”),
recirculation/outside – air select and blower speed, and ON/OFF of air conditioning
will be controlled automatically.
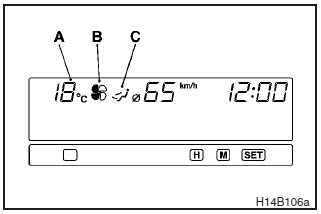
The following items are displayed in the multi center display. (Refer to “Multi center display” on page 4–24.)
A- Outside air temperature display/Set temperature display
B- Blower speed
indicator
C- Air flow indicator
NOTE
(1) The outside air temperature is usually displayed in the position (A). The set temperature is displayed for several seconds while the temperature control dial is operated.
(2) If the outside temperature drops below about 3 C, the alarm sounds and the outside temperature figure flashes for about 5 seconds. Turning the temperature adjustment dial during the period of the alarm will have no effect on the display. After completion of the warning, set the temperature. (Refer to “Outside temperature” on page 4–25.)
See also:
Vehicle care
In order to maintain the value of your vehicle, it is necessary to perform regular
maintenance using the proper procedures. Always maintain your vehicle in compliance
with any environmental pollut ...
Rear room lamp
When replacing the bulb, put the rear room lamp switch into the “OFF” position.
1. Insert a straight blade (or minus) screwdriver with a cloth over its tip into
the notch of the lamp assembly a ...
Passenger’s switches
The passenger’s switches can be used to operate the corresponding passenger’s
door windows. Press the switch down for operating the window, and pull up the switch
for closing.
Note
► ...