Coming home light
This function turns on the headlamps in the low beam setting for about 30 seconds after the ignition switch is turned to the “LOCK” position.
1. Turn the combination headlamps and dipper switch to the “OFF” or “AUTO” position
(for vehicles equipped with the automatic lamp control).
2. Turn the ignition switch to the “LOCK” position.
Also, if a key was used to start the engine, remove the key from the ignition switch.
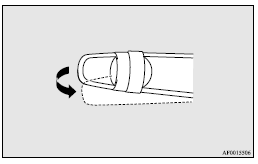
3. Within 60 seconds of turning the ignition switch to the “LOCK” position, pull
the turn signal lever towards you.
4. The headlamps will come on in the lowbeam setting for about 30 seconds. After the headlamps go off, the headlamps can be turned on again in the low beam setting for about 30 seconds by pulling the turn signal lever towards you within 60 seconds of turning the ignition switch to the “LOCK” position.
To turn on the headlamps again after 60 seconds of turning the ignition switch to the “LOCK” position, repeat the process from step 1.
![]() Note
Note
► While the coming home light function is operating, perform one of the following
operations to cancel the function.
• Pull the lever towards you.
• Turn the combination headlamps and dipper switch to the
 position.
• Turn the ignition switch to the “ON” position.
► It is possible to modify functions as follows:
• The time that the headlamps remain on can be changed.
• The coming home light function can be deactivated.
For further information, we recommend you to consult a MITSUBISHI MOTORS Authorized
Service Point.
On vehicles equipped with MITSUBISHI Multi-Communication System (MMCS), screen operations
can be used to make the adjustment. Refer to the separate owner’s manual for details.
See also:
To listen to the radio
1- PWR (On-off) switch 2- VOL (Volume control) knob 3- U/M/L (UKW/MW/LW selection)
button 4- Audio adjust button 5- AUDIO button 6- TUNE/SEEK (Down-step/Down-seek)
button 7- TUNE/SEEK (Up-step/U ...
Steering wheel lock
[For vehicles equipped with keyless operation system]
For information on operations for vehicles equipped with the keyless operation
system, refer to “Keyless operation system: Steering wheel loc ...
Interior & Cargo
Despite being 4 inches shorter overall than the Tucson and a surprising 14
inches shorter than the Rogue, the Outlander Sport's passenger volume is
plentiful: 98 cubic feet versus 102 and 98 cubic ...