Operating the system in manual air mode
Blower speed and ventilator mode may be controlled manually by setting the blower speed selection dial and the mode selection dial to the desired positions.
To return to automatic operation, set the dials to the “AUTO” position.
Demisting of the windscreen and door windows
![]() Caution
Caution
► For safety, make sure you have a clear view through all the windows.
To remove frost or mist from the windscreen and door windows, use the mode selection
dial ( or
or
 ).
).
For ordinary demisting
Use this setting to keep the windscreen and door windows clear of mist, and to keep the leg area heated.
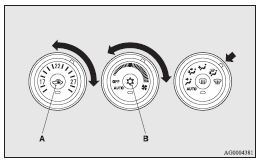
1. Set the air selection switch (A) to the outside position.
2. Set the mode selection dial to the
position.
3. Select your desired blower speed by turning the blower speed selection dial.
4. Select your desired temperature by turning the temperature control dial.
5. Push the air conditioning switch (B).
For quick demisting
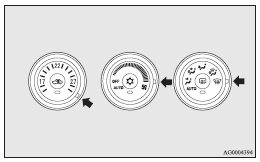
1. Set the mode selection dial to the
position.
2. Set the blower to the maximum speed.
3. Set the temperature to the highest position.
![]() Note
Note
► While the mode selection dial is set to the
position, the air conditioning will
operate automatically and the outside air position will also be selected automatically.
► To demist effectively, direct the air flow from the side ventilators towards the
door windows.
► Do not set the temperature control dial to the max. cool position. Cool air will
blow against the window glasses and prevent demisting.
► For vehicles with the Auto Stop & Go (AS&G) system, if the mode selection dial
is set to the demister position shown in the illustration, the Auto Stop & Go (AS&G)
system will not operate and the engine will not stop automatically even if the vehicle
is stopped.
This is to ensure that good visibility is maintained.
See also:
Safety and disposal information for used engine oil
WARNING
• Prolonged and repeated contact may cause serious skin disorders, including
dermatitis and cancer.
• Avoid contact with the skin as far as possible and wash thoroughly after any
co ...
Side airbag system
The side airbags (A) are contained in the driver and front passenger seatbacks.
The side airbag is designed to inflate only on the side of the vehicle that is
impacted, even with no passenger in th ...
Twin Clutch SST control mode display screen (vehicles equipped with Twin Clutch
SST)
The operation status of the Twin Clutch SST control mode is displayed.
Refer to “Twin Clutch SST control mode”. ...