Wheel condition
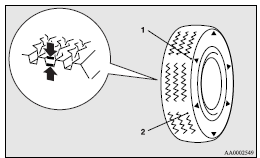
1- Location of the tread wear indicator
2- Tread wear indicator
Check the tyres for cuts, cracks and other damage.
Replace the tyres if there are deep cuts or cracks.
Also check each tyre for pieces of metal or pebbles.
The use of worn tyres can be very dangerous because of the greater chance of skidding or hydroplaning.
The tread depth of the tyres must exceed 1.6 mm in order for the tyres to meet the minimum requirement for use.
Tread wear indicators will appear on the surface of the tyre as the tyre wears, thereby indicating that the tyre no longer meets the minimum requirement for use. When these wear indicators appear, the tyres must be replaced with new ones.
On 4-wheel drive vehicles, when replacement of any of the tyres is necessary, replace all of them.
![]() Caution
Caution
► Always use tyres of the same size, same type, and same brand, and which
have no wear differences.
Using tyres of different size, type, brands or degree of wear, will increase the
differential oil temperature, resulting in possible damage to the driving system.
Further, the drive train will be subjected to excessive loading, possibly leading
to oil leakage, component seizure, or other serious faults.
See also:
Caution for installing the child restraint on vehicle with front passenger air
bag
The label shown here is attached on vehicles with front passenger air bag. If
this label is attached, never install the rearfacing child restraint on the front
passenger’s seat.
WARNING
(1 ...
Driving hints
(1) TCL does not actively apply brakes. Always decelerate the vehicle sufficiently
before entering corners or bends. (2) On snowy or icy roads, drive slowly using
tyre chains or snow tyres. (3) Wh ...
Instruments and Controls (Driver’s area)
1. Shift paddles
2. Wiper and washer switch
Rear window wiper and washer switch
3. Cruise control switches
4. Ignition switch
5. Supplemental restraint system - airbag (for driver’s seat)
...