Wiper blade rubber replacement
If the blades are frozen to the windscreen or rear window, do not operate the wipers until the ice has melted and the blades are freed, otherwise the wiper motor may be damaged.
Windscreen wiper blades
1. Lift the wiper arm off the windscreen.
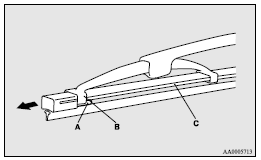
2. Pull the wiper blade until its stopper (A) disengages from the hook (B). Then,
pull the wiper blade further to remove it.
![]() Note
Note
► Do not allow the wiper arm to fall onto the windscreen; it could damage the glass.
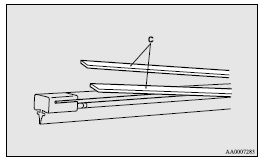
3. Attach the retainers (C) to a new wiper blade.
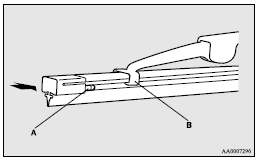
4. Insert the wiper blade into the arm, starting with the opposite end of the blade from the stopper. Make sure the hook (B) is fitted correctly in the grooves in the blade.
![]() Note
Note
► If retainers are not supplied with the new wiper blade, use the retainers from the old blade.
5. Push the wiper blade until the hook (B) engages securely with the stopper (A).
Rear window wiper blades
1. Lift the wiper arm off the window glass.
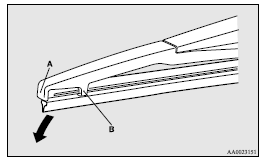
2. Pull the wiper blade downward to disengage it from the stopper (A) at the end
of the wiper arm. Pull the wiper blade further to remove it.
3. Slide a new wiper blade through the hook (B) on the wiper arm.
![]() Note
Note
► Do not allow the wiper arm to fall onto the window glass; it could damage the glass.
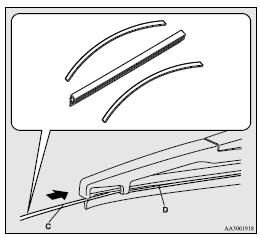
4. Firmly insert the retainer (C) into the groove (D) in the wiper blade.
Refer to the illustration to ensure that the retainers are correctly aligned as you insert them into the groove.
![]() Note
Note
► If a retainer is not supplied with the new wiper blade, use the retainer from the old blade.
See also:
SRS servicing
The entire SRS including air bag and pretensioner seat belt must be inspected
by an authorized MITSUBISHI dealer after 10 years.
WARNING
(1) Any maintenance performed on or near the components of ...
Changing the function settings (when the ignition switch or the operation
mode
is ON)
1. Stop the vehicle in a safe place.
Firmly apply the parking brake and put the gearshift lever into the “N” (Neutral)
position (M/T) or the selector lever into the “P” (PARK) position (CVT ...
Digital clock
Automatic mode and manual mode are available for digital clock adjustment.
Select the automatic mode or the manual mode by performing the following operations:
1. Press the PWR switch (A) to turn ...