Headlamps (high-beam, except for vehicles with high intensity discharge headlamps)
1. When replacing the bulb on the right side of the vehicle, remove the bolt (A) holding down the washer tank spout and move the spout towards the rear of the vehicle.
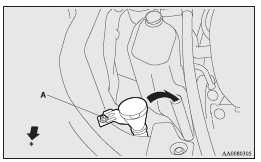
: Front of the vehicle
2. Turn the cap (B) anticlockwise to remove it.
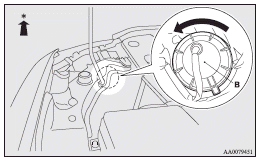
: Front of the vehicle
3. Turn the bulb (C) anticlockwise to remove it.
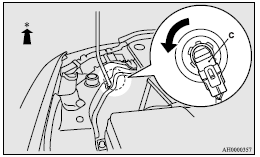
: Front of the vehicle
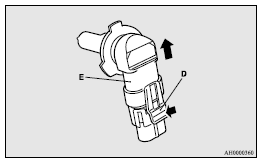
4. While pressing the tab (D), pull out the bulb (E).
5. To install the bulb, perform the removal steps in reverse.
![]() Caution
Caution
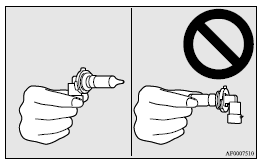
► Handle halogen lamp bulbs with care.
The gas inside halogen lamp bulbs is highly pressurized, so dropping, knocking,
or scratching a halogen lamp bulb can cause it to shatter.
► Never hold the halogen lamp bulb with a bare hand, dirty glove, etc. The oil from
your hand could cause the bulb to break the next time the headlamps are operated.
If the glass surface is dirty, it must be cleaned with alcohol, paint thinner, etc.,
and refit it after drying it thoroughly.
See also:
Safe driving techniques
Driving safety and protection against injury cannot be fully ensured. However,
we recommend that you pay extra attention to the following:
Seat belts
Before starting the vehicle, make sure that yo ...
Head restraints
Warning
► Driving without the head restraints in place can cause you and your passengers
serious injury or death in an accident. To reduce the risk of injury in an accident,
always make su ...
Infants and small children
When transporting infants and small children in your vehicle, follow the instruction
given below.
Instruction:
(1) For small infants, an infant carrier should be used. For small children whose
...