Bending lamps (Adaptive Front lighting System (AFS)) (for vehicles equipped
with high intensity discharge headlamps)
1. When replacing the bulb on the right side of the vehicle, remove the bolt (A) holding down the washer tank spout and move the spout towards the rear of the vehicle.
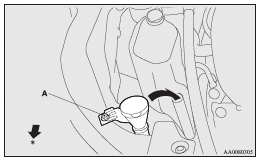
: Front of the vehicle
2. Turn the cap (B) anticlockwise to remove it.
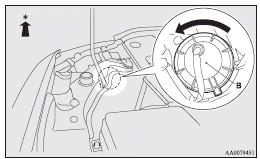
: Front of the vehicle
3. Turn the bulb (C) anticlockwise to remove it.
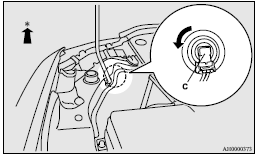
: Front of the vehicle
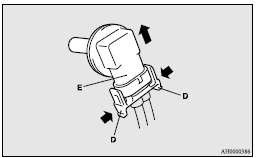
4. While pressing the tab (D), pull out the bulb (E).
5. To install the bulb, perform the removal steps in reverse.
![]() Caution
Caution
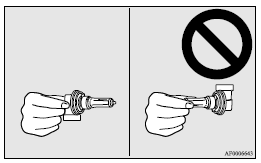
► Handle halogen lamp bulbs with care.
The gas inside halogen lamp bulbs is highly pressurized, so dropping, knocking,
or scratching a halogen lamp bulb can cause it to shatter.
► Never hold the halogen lamp bulb with a bare hand, dirty glove, etc. The oil from
your hand could cause the bulb to break the next time the bending lamps (Adaptive
Front lighting System (AFS)) are operated.
If the glass surface is dirty, it must be cleaned with alcohol, paint thinner, etc., and refit it after drying it thoroughly.
See also:
Testing the system
Open all of the door windows, then set the Dead Lock System. (Refer to “Setting
the system”.) After setting the Dead Lock System, reach into the vehicle
through a window and confirm that you c ...
Side airbag system
The side airbags (A) are contained in the driver and front passenger seatbacks.
The side airbag is designed to inflate only on the side of the vehicle that is
impacted, even with no passenger in th ...
To listen to a CD
1- PWR (On-off switch) 2- U/M/L button 3- CD (CD mode changeover) button
4- Disc loading slot 5- CD eject button 6- DISC (Disc selection) button* 7-
(Track down) button 8- (Track up) button 9- S ...