Tools, jack and tyre repair kit
Storage
The tools, jack and tyre repair kit are stowed in the luggage compartment.
The storage location of the tools, jack and tyre repair kit should be remembered in case of an emergency.
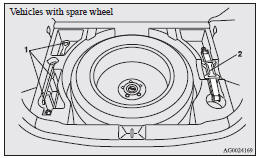
1- Tools
2- Jack
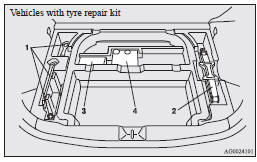
1- Tools
2- Jack
3- Tyre repair set
4- Tyre compressor
Tools

1- Wheel nut wrench
2- Jack bar
3- Towing hook
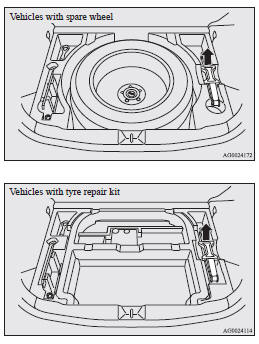
Jack
Before removing the jack, lift up the luggage floor board.
Tyre repair kit
This kit enables emergency repair of a small puncture in the tread area of a tyre that has run over a nail, screw, or similar object.
1- Tyre compressor
2- Tyre sealant bottle
3- Valve insert (spare)
4- Valve remover
5- Filler hose
6- Extension hose
(This hose is used for removal of sealant. It is not used in emergency puncture
repair.)
7- Speed restriction sticker
![]() CAUTION
CAUTION
• The tyre sealant can cause health damage if swallowed. If you accidentally
swallow it, drink as much water as possible and immediately consult a doctor.
• If the tyre sealant gets in your eyes or on your skin, rinse with lots of water.
If you still sense an abnormality, consult a doctor.
• Consult a doctor immediately if any allergic reactions occur.
• Do not allow children to touch the tyre sealant.
• Do not breathe in the vapours of tyre sealant.
![]() NOTE
NOTE
• The tyre sealant cannot be used in any of the situations listed below. If any of these situations occurs, please contact a MITSUBISHI MOTORS Authorized Service Point or another specialist.
• The tyre sealant’s expiry date has passed.
(The expiry date is shown on the bottle label.)
• More than one tyre is punctured.
• The puncture hole has a length or width of 4 mm or more.
• The tyre is punctured in the side wall (A), not in the tread (B).
• The vehicle has been driven with the tyre almost completely flat.
• The tyre has completely slipped over the wheel rim and has come off the wheel.
• The wheel is damaged.
• Use the tyre sealant only at ambient temperatures of -30 °C to + 60 °C.
• Effect an emergency repair without pulling out the object (nail, screw, etc.) that is stuck in the tyre.
• Do not use the tyre sealant if the tyre has been damaged by being driven when insufficiently inflated (e.g. bumps, cuts, cracks etc.
on the tyre).
• Allow any tyre sealant seeping out of the hole to dry, then pull off like a
film.
• Wipe tyre sealant off the paintwork immediately with a damp cloth.
• Allow any tyre sealant in a damaged tyre to dry out and dispose of it together
with the tyre.
• Immediately change out of any clothes contaminated with the tyre sealant.
Before repairing a tyre, first stop your vehicle in a safe, flat location.
1. Park the vehicle on level and stable ground.
2. Set the parking brake firmly.
3. On vehicles with M/T, stop the engine and move the gearshift lever to the
“R” (Reverse) position.
On vehicles with CVT, move the selector lever to the “P” (PARK) position and stop the engine.
4. Turn on the hazard warning flashers and set up a warning triangle, flashing
signal lamp, etc., at an adequate distance from the vehicle, and have all your passengers
leave the vehicle.
5. Take out the tyre sealant bottle and the compressor.
6. Shake the tyre sealant bottle well.
![]() NOTE
NOTE
• In cold conditions (when the ambient temperature is 0 °C or lower), thickening of the tyre sealant can make the tyre sealant hard to squeeze out of the bottle. Warm the bottle inside the vehicle.
7. Do not remove the seal (C). Screw the filler hose (D) onto the bottle (E). As you screw the filler hose onto the bottle, the seal will break, allowing the sealant to be used.
![]() CAUTION
CAUTION
• If you shake the bottle after screwing on the hose, sealant may spray out of the hose.
8. Take the valve cap (F) off the tyre valve (G), then press the valve remover (H) onto the valve as illustrated. Allow all of the air in the tyre to escape.
9. Remove the valve insert (I) by turning it anticlockwise using the valve remover (H). Put the removed valve insert in a clean place so it does not get dirty.
![]() CAUTION
CAUTION
• If there is any air left in the tyre when you remove the valve insert, the valve insert may fly out and injure you. Make sure the tyre contains no air before removing the valve insert.
10. Remove the plug (J) from the free end of the hose (K).
Press the hose onto the valve (G).
11. Holding the sealant bottle upside-down, squeeze it again and again to inject all of the sealant into the tyre.
![]() NOTE
NOTE
• When injecting the sealant, position the valve away from the bottom, i.e., away from the point where the tyre touches the ground.
If the valve is near the point where the tyre touches the ground, the sealant may not go into the tyre easily.
12. After injecting the sealant, pull the hose off the valve, remove any residual sealant from the valve, rim and/or tyre.
Fit the valve insert (I) into the valve (G), and screw the valve insert securely into place using the valve remover (H).
![]() NOTE
NOTE
• When removing and screwing in the valve insert using the valve remover, turn the valve remover by hand. Using a tool to turn the valve remover could damage it.
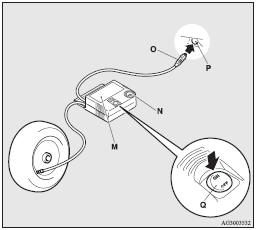
13. Pull out the compressor hose (L) from the side of the tyre compressor, and then securely attach the hose to the tyre valve (G).
14. Place the compressor (M) with its air pressure gauge (N) on top.
Pull out the compressor’s power cord (O), insert the plug on the cord into the accessory socket or cigarette lighter socket (P), and then turn the ignition switch to “ACC” position or put the operation mode in ACC.
Turn ON the compressor switch (Q) and inflate the tyre to the specified pressure.
![]() CAUTION
CAUTION
• The supplied compressor is designed only for inflation of passenger vehicle tyres.
• The compressor is designed to run on a vehicle’s 12 V power supply. Do not connect it to any other power source.
• The compressor is not waterproof. If you use it in rain, make sure water does not get on it.
• Any sand or dust sucked into the compressor could make the compressor break down. Do not place the compressor directly on any sandy or dusty surface when using it.
• Do not disassemble or modify the compressor.
Also, do not subject the air pressure gauge to shock. It could malfunction.
15. Check and adjust the tyre pressure with reference to the air pressure gauge on the compressor.
If you overinflate the tyre, release air by loosening the hose’s end fitting. (Refer to “Tyre inflation pressures”.) If there is a gap between the tyre and wheel because the tyre has moved inward from the wheel rim, press the periphery of the tyre towards the wheel to close the gap before running the compressor. (With no gaps, the tyre pressure will rise.)
![]() CAUTION
CAUTION
• Be careful not to get your fingers trapped between the tyre and wheel as the tyre inflates.
• The surface of the compressor will get hot while the compressor is running. Do not keep the compressor running continuously for more than 10 minutes. After using the compressor, wait for the compressor to cool before using it again.
• If the compressor becomes sluggish or hot while operating, it is overheating. Immediately place the switch in the OFF position and let the compressor cool down for at least 30 minutes.
![]() NOTE
NOTE
• If the tyre pressure does not rise to the specified level within 10 minutes, the tyre may be so severely damaged that the tyre sealant cannot be used to effect an emergency repair.
Please contact a MITSUBISHI MOTORS Authorized Service Point or another specialist in this event.
16. Turn OFF the compressor switch, then pull the power cord plug out of the socket.
![]() NOTE
NOTE
• Simply putting sealant and air into the tyre using the tyre repair kit does not seal the puncture hole. Air will leak through the puncture hole until the emergency repair procedure is completed (through step 19 of these instructions).
17. When you have inflated the tyre to the specified pressure, stow the compressor, bottle, and other items in the vehicle and promptly start driving the vehicle. Drive with great care. Do not exceed a speed of 80 km/h (50 mph). Observe local speed limits.
![]() CAUTION
CAUTION
• If you sense any abnormality while driving, stop the vehicle and contact a MITSUBISHI MOTORS Authorized Service Point or another specialist. Otherwise the tyre pressure may drop before the emergency repair procedure is completed, rendering the vehicle unsafe.
![]() NOTE
NOTE
• Driving faster than 80 km/h (50 mph) can make the vehicle vibrate.
18. After driving for 10 minutes or 5 km (3 miles), check the tyre pressure using the air pressure gauge on the compressor.
(Refer to “Tyre inflation pressures”.) If the tyre pressure is not sufficient, inflate the tyre to the specified pressure again and drive the vehicle carefully without exceeding a speed of 80 km/h (50 mph).
![]() CAUTION
CAUTION
• If the tyre pressure is lower than the minimum permitted pressure (1.3 bar {130 kPa}), the tyre cannot successfully be repaired with the tyre sealant. Do not drive the vehicle any further. Contact a MITSUBISHI MOTORS Authorized Service Point or another specialist.
19. After driving for 10 minutes or 5 km (3 miles), check the tyre pressure using the air pressure gauge on the compressor. (Refer to “Tyre inflation pressures”.) If the tyre pressure has apparently not dropped, the emergency repair procedure is complete.
You must still not exceed a speed of 80 km/h (50 mph). Observe local speed limits.
![]() NOTE
NOTE
• If the tyre pressure has dropped below the specified level when you check it at the end of the repair procedure, do not drive the vehicle any further. Contact a MITSUBISHI MOTORS Authorized Service Point or another specialist.
• In cold conditions (when the ambient temperature is 0 °C or lower), the time and driving distance necessary until completion of the repair can be longer than in warmer conditions, meaning that the tyre pressure can drop below the specified level even when you have inflated the tyre a second time and subsequently driven the vehicle. If this happens, inflate the tyre to the specified pressure once more, drive for about 10 minutes or 5 km (3 miles), then check the tyre pressure again. If the tyre pressure has again dropped below the specified level, stop driving the vehicle and contact a MITSUBISHI MOTORS Authorized Service Point or another specialist.
20. Affix the speed restriction sticker (R) to the steering wheel at the position shown in the illustration.
Then immediately drive with great care to a MITSUBISHI MOTORS Authorized Service Point or another specialist and have tyre repair/replacement performed.
![]() CAUTION
CAUTION
• Do not affix the sticker anywhere except the specified position on the pad of the steering wheel. Affixing the sticker in an incorrect position could prevent the SRS airbag from working normally.
• Be sure to check the tyre pressure for confirmation that the emergency repair procedure is complete.
![]() NOTE
NOTE
• Please give the empty sealant bottle to your MITSUBISHI MOTORS Authorized Service Point when you purchase new sealant or dispose of the sealant bottle according to national regulations for the disposal of chemical waste.
• A tyre in which puncture sealant has been used should ideally be replaced with a new one. If you wish to have such a tyre properly repaired for reuse, please contact a MITSUBISHI MOTORS Authorized Service Point or another specialist. Note that a proper repair is impossible following an emergency repair if the puncture hole cannot be located.
• Wipe away any sealant that gets on the wheel. Provided the valve is replaced with a new one, the wheel can be reused.
• The manufacturer is unable to guarantee that all tyre punctures can be repaired with the tyre repair kit, in particular cuts or perforations with a diameter of more than 4 mm or away from the tyre’s tread. The manufacturer is not liable for damage sustained through improper use of the tyre repair kit.
• The manufacturer is not liable for damage sustained through re-use of any tyre in which tyre sealant has been used.
See also:
Installing a child restraint system to a 3-point type seat belt (with emergency
locking mechanism)
Installation:
1. Fasten the seat belt to secure the child restraint system. Make sure you hear
a “click” when you insert the latch plate in the buckle.
2. Remove all slack by using the locki ...
Safety
The Mitsubishi Outlander Sport earned top scores of Good in the Insurance
Institute for Highway Safety's front- and side-impact crash tests. It hasn't
been tested for rear impact or roof strength ...
Sunshade
WARNING
• Never leave a child (or other person who might not be capable of safe operation
of the sunshade switch) in the vehicle alone.
• Before operating the sunshade, make sure that nothing ...