Installing a child restraint system to a 3-point type seat belt (with emergency/automatic
locking mechanism)

The 3-point type seat belts at the seat positions above can be converted from normal emergency locking retractor (ELR) mode to automatic locking retractor (ALR) mode. It must be so converted, when installing a child restraint system.

Installation:
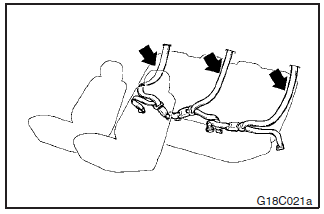
1. Place the child restraint system in the rear seating position as shown in
the illustration.
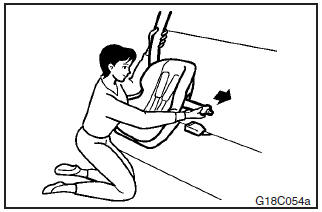
2. Route the belt through the child restraint according to the
child restraint system manufacturer’s instructions, then insert the latch plate
into the buckle.

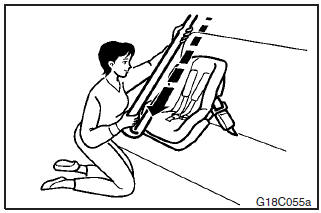
3. To activate the ALR mode, slowly pull the shoulder part of the belt all the
way out until it stops, then let the belt feed back into the retractor.
4. After
the belt has retracted, tug on it. If the belt is locked, you will not be able to
pull it out. If you can pull the belt out, it is not locked and you will need to
repeat these steps.

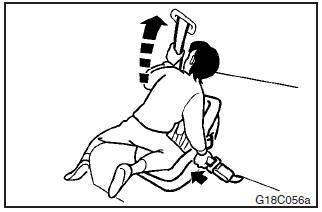
5. After confirming that the belt is locked, grab the shoulder part of the belt
near the buckle and pull up to remove any slack from the lap part of the belt. Remember,
if the lap part of the belt is not tight, the child restraint will not be secure.
It may help to put weight on the child restraint or to push on the seatback while
pulling up on the belt.
6. Before putting the child in the restraint, push and
pull the restraint in all directions to be sure it is secure. Do this before each
use.
7. To deactivate the ALR mode in order to remove a child restraint etc.,
after removing the child from the restraint, unlatch the buckle, unroute the seat
belt, let the belt fully retract and rewind the belt.
NOTE
If the seat belt does not lock, rewind it fully, then perform step 2 to 7 again.
WARNING
(1) Before putting the child in the restraint, be absolutely sure to make
the conversion of the retractor from the ELR mode to the ALR mode. By doing so,
the child restraint system is always tightly secured to the seat by the automatic
lock. If the conversion to ALR is not made, the child restraint system could move
forward in the event of sudden braking or an accident, seriously injuring the child
or other occupants.
(2) If a person wearing the seat belt moves one’s upper body
significantly such that the belt completely unwinds, the retractor may switch to
its ALR mode and lock, thus preventing further movement. If this happens, the person
should switch the retractor back to its ELR mode by taking off the seat belt and
fully rewinding it. The person should then wear the seat belt again.
See also:
Digital clock
Automatic mode and manual mode is available for digital clock adjustment.
Select the automatic mode or the manual mode by performing the following operations:
A- PWR switch
B- TUNE switch
1. Pre ...
Sun visors
1- To eliminate front glare
2- To eliminate side glare ...
Cargo loads precautions
Caution
► Do not load cargo or luggage higher than the top of the seatback. Be sure
that your cargo or luggage cannot move once your vehicle is moving.
Having the driver’s vision blocked, ...
