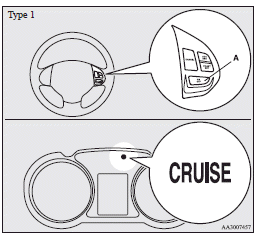
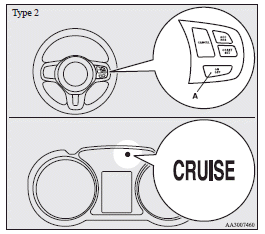
To activate
1. With the ignition switch in the “ON” position, press the “ON OFF” switch (A) to turn on the cruise control. The “CRUISE” indication lamp in the meter cluster will come on.
![]() Note
Note
► If the cruise control is on when the ignition switch is turned to the “LOCK”
or “ACC” position, cruise control will be on automatically the next time you start
the engine. The “CRUISE” indication lamp will also be on.
► If the battery voltage is insufficient, the memory data for the cruise control
may be erased.
As a result, the “CRUISE” indication lamp may not come on when you restart the engine.
If this happens, press the “ON OFF” switch once again to turn on the cruise control.
2. Confirm that the Twin Clutch SST control mode is set to “NORMAL” (on vehicles equipped with Twin Clutch SST). Refer to “Twin Clutch SST control mode”.
![]() Note
Note
► The cruising speed cannot be set when the Twin Clutch SST control mode is set to “SPORT” mode.
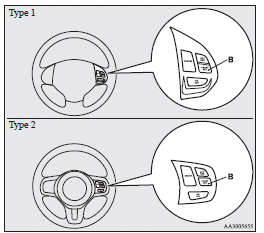
3. Accelerate or decelerate to your desired speed, then press and release the “COAST SET” switch (B) when the “CRUISE” indication lamp is illuminated. The vehicle will then maintain the desired speed.
![]() Note
Note
► When you release the “COAST SET” switch, the vehicle speed will be set.
See also:
Gas Mileage
The Lancer GT's gas mileage maxes out at an EPA-estimated 31 mpg on the
highway — a number that was merely average even back when this Lancer generation
was introduced. The smaller, more efficie ...
Auto Stop & Go (AS&G) system
The Auto Stop & Go (AS&G) system automatically stops and restarts the engine
without operating the ignition switch or the engine switch when the vehicle is stopped,
such as at a traffic li ...
Emergency starting
If the engine cannot be started because the battery is weak or dead, the battery
from another vehicle can be used with jumper cables to start the engine.
WARNING
• To start the engine using jum ...