Position lamps (for vehicles equipped with high intensity discharge headlamps)
1. To create enough work space, turn the steering wheel all the way in the direction opposite to the side you wish to replace.
2. Remove the clips (A) and screws (B) to turn up the cover (C).
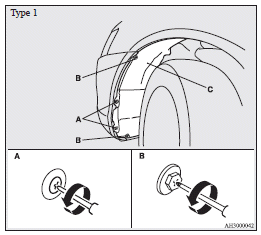
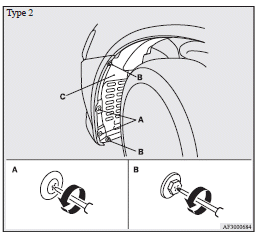
3. Turn the socket (D) anticlockwise to remove it.
4. Pull the bulb out of the socket.

5. To install the bulb, perform the removal steps in reverse.
See also:
Lamps (room lamps, etc.) auto-cutout function (Vehicles with keyless entry system
or keyless operation system)
If any of the interior lamps are left switched on with the ignition switch in
any position other than “ON” or “ACC”, it goes off automatically after approximately
30 minutes.
The lamp goe ...
Operation sound setting
You can turn off the operation sounds of the multiinformation meter switch and
daytime dipper button.
1. Press and hold the multi-information meter switch for about 2 seconds or more
to switch fr ...
Moving the gearshift lever to the “R” (Reverse) position
Vehicles equipped with 5M/T
To shift into the “R” (Reverse) position from 5th gear, move the gearshift lever
to the “N” (Neutral) position, and then move it to the “R” (Reverse) positio ...