
Rear fog lamp switch
The rear fog lamp can be operated when the headlamps or front fog lamps (if so equipped) turn on.
An indication lamp in the instrument cluster comes on when the rear fog lamp is turned on.
[Vehicle without front fog lamps]
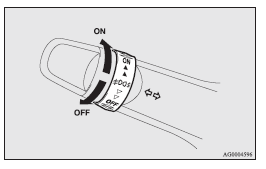
Turn the knob once in the “ON” direction to turn on the rear fog lamp. To turn the rear fog lamp off, turn the knob once in the “OFF” direction. The knob will automatically return to its original position when you release it.
[Vehicle with front fog lamps]
Turn the knob once in the “ON” direction to turn on the front fog lamps. Turn the knob once more in the “ON” direction to turn on the rear fog lamp. To turn the rear fog lamp off, turn the knob once in the “OFF” direction. Turn the knob once more in the “OFF” direction to turn off the front fog lamps.
The knob will automatically return to its original position when you release it.
 NOTE
NOTE
• The rear fog lamp is automatically turned off when the headlamps or front fog lamps (if so equipped) are turned off.
• To turn the rear fog lamp on again, turn the knob once in the “ON” direction after turning on the headlamps. (Vehicle without front fog lamps)
• To turn the rear fog lamp on again, turn the knob twice in the “ON” direction after turning on the headlamps. (Vehicle with front fog lamps)
See also:
Cruise control switches
A- “ON OFF” switch
Used to turn on and off the cruise control.
B- “COAST SET” switch
Used to reduce the set speed and to set the desired speed.
C- “ACC RES” switch
Used to increase ...
Warning display list (when the ignition switch is “ON”)
...
Cleaning plastic parts
Use a sponge or chamois leather.
If a car wax adheres on a grey or black rough surface of the bumper, moulding
or lamps, the surface becomes white. In such a case, wipe it off using lukewarm
wate ...