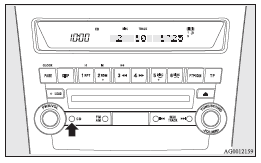
To listen to a CD
With CD player
1. Insert disc with label facing up.
When a disc is inserted, the CD indicator will come on and the CD player will begin playing even if the radio is being used. The CD player will also start playback when the CD button is pressed with a disc in the player or with a disc set in the CD insertion slot, even if the radio is being used.
2. To stop the CD, turn off the power by pressing the PWR switch, or change over to the radio mode by pressing the AM/FM button, or eject the disc by pressing the eject button.
![]() NOTE
NOTE
• For information on adjusting the volume and tone, refer to “To adjust the volume” and “To adjust the tone”.
• When an 8 cm compact disc is used, the adapter is not needed for playback. Insert the disc in the centre of the disc-loading slot.
• For information concerning the handling of compact discs, refer to “Handling of compact discs”.
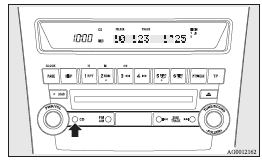
With CD changer
The CD can be loaded or ejected by pressing the LOAD button or the eject button even if the audio system power is off.
1. Press the PWR switch to turn the audio system ON and OFF. The audio system
turns on in the last mode used.
2. Press the CD button to enter CD mode.
The CD changer will start playback if the CD is already in the CD changer.
3. To stop the CD, turn off the power by pressing the PWR switch, or change over to the radio mode by pressing the AM/FM button, or eject the disc by pressing the eject button.
![]() NOTE
NOTE
• For information on adjusting the volume and tone, refer to “To adjust the volume” and “To adjust the tone”.
• As many as 6 CDs can be inserted into the CD changer.
• 8 cm CDs cannot be played on this CD changer.
• For information concerning the handling of compact discs, refer to “Handling of compact discs”.
To set a single disc
1. Press the LOAD button briefly.
2. The CD changer will show “WAIT” on the display and start making itself ready
for disc loading.
3. When the CD changer is ready for disc loading, the LOAD indicator will illuminate
and the display will show “LOAD DISC No. (1-6)”.
4. When a disc is inserted into the CD slot, the disc will begin to play.
![]() NOTE
NOTE
• If there are multiple empty slots, you can select your desired slot by pressing the DISC buttons.
• If you do not insert a disc for about 15 seconds after the CD changer starts standing by for loading, the loading standby mode will be cancelled.
To set all the discs
1. Press the LOAD button for 2 seconds or longer (until you hear a beep).
2. The CD changer will select the lowest-numbered empty slot and switch to loading standby mode.
3. When the display shows “LOAD DISC No.
(1-6)” insert a disc. The CD changer will then automatically select the next empty slot and enter loading standby mode.
4. Repeat the above-described steps until every slot contains a disc. Playback will then begin with the disc that you inserted last.
![]() NOTE
NOTE
• If you press the LOAD button again while the CD changer is in loading standby mode, the loading standby mode will be cancelled.
To select a desired disc
You can select your desired disc by using the DISC button. The active disc will be indicated on the display.
<Disc up>
Press the DISC (Disc up) button repeatedly until the desired disc number appears on the display.
<Disc down>
Press the DISC (Disc down) button repeatedly until the desired disc number appears on the display.
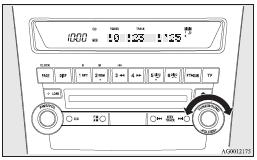
To listen to a music CD
Push the CD button if a disc is already in the audio system. The audio system will enter CD mode and start playback. The disc number (if the audio system is equipped with the CD changer), the track number, and the playing time will appear on the display.
The discs in the CD changer unit will be played consecutively and continuously.
To listen to an MP3 CD
This audio system allows you to play MP3 (MPEG Audio Layer-3) files recorded on CD-ROMs, CD-Rs (recordable CDs), and CD-RWs (rewritable CDs) in ISO9660 Level 1/Level 2, Joliet, and Romeo formats. Each disc can hold up to 255 files in up to 100 folders, up to a maximum of 16 levels.
The ID3 tag information can be displayed during MP3 playback. For information concerning ID3 tags, refer to “CD text and MP3 title display”.
Push the CD button if a disc is already in the audio system.
The display shows “READING”, then playback will begin.
The folder number, the track number, the playingtime and “MP3” indicator will appear on the display.
![]() NOTE
NOTE
• While listening to a disc on which CD-DA (CD-Digital Audio) and MP3 files have both been recorded, you can switch between reading of the CD-DA, reading of the MP3 files, and the external audio input mode by pressing the CD button for 2 seconds or longer (until you hear a beep).
For information on the external audio input mode, refer to “To use the external audio input function”.
• With a disc that contains both CD-DA and MP3 files, the CD-DA files are automatically played first.
• The playback sound quality differs depending on the encoder software and the bit rate.
For more information, refer to the owner’s manual for the encoder software.
• Depending on the layout of the files and folders on the disc, it may take some time until playback starts.
• MP3 conversion software and writing software are not supplied with this unit.
• You may encounter trouble in playing an MP3 or displaying the information of MP3 files recorded with certain writing software or CD recorders (CD-R/RW drivers).
• If you write many folders or files other than MP3 files, it may take some time before playback starts.
• This unit does not record MP3 files.
• For information on CD-Rs/RWs, refer to “Notes on CD-Rs/RWs”.
![]() CAUTION
CAUTION
• Attempting to play a file not in the MP3 format which has a “.mp3” file name may produce noise from the speakers and speaker damage, and can significantly damage your hearing.
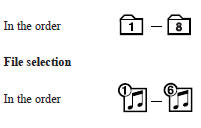
Folder selection order/MP3 file playback order (Example)
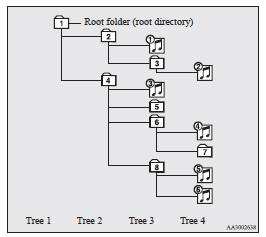
Folder selection
To fast-forward/reverse the disc
Fast-forward
The disc is fast-forwarded while the
 button is held down. Playback will
begin once the button is released.
button is held down. Playback will
begin once the button is released.
Fast-reverse
The disc is fast-reversed while the
 button is held down. Playback will
begin once the button is released.
button is held down. Playback will
begin once the button is released.
To select a desired folder (MP3 CDs only)
You can select your desired folder by turning the FOLDER switch.
Folder up
Turn the FOLDER switch clockwise until the desired folder number appears on the display.
Folder down
Turn the FOLDER switch anticlockwise until the desired folder number appears on the display.
To select a desired track
You can cue tracks on a disc by using the
 or
or
 button.
Track up
The disc will skip as many songs as the number of times the button
is pushed.
The display window will display the track number of the track selected.
Track down
The disc will skip as many songs as the number of times the button
is pushed.
The display window will display the track number of the track selected.
To repeat tracks
Press the RPT button to repeat the same track.
If the RPT button is pressed, the RPT indicator will come on.
To exit this mode, press the button again.
To repeat a disc (music CDs only) <CD changer>
While a song is playing, press the RPT button for 2 seconds or longer (until you hear a beep). The D-RPT indicator will come on and the disc will repeat all the songs on the disc.
To exit this mode, press the button again.
To repeat songs in the same folder (MP3 CDs only)
While a song is playing, press the RPT button for 2 seconds or longer (until you hear a beep). The D-RPT indicator will come on and the disc will repeat all the songs in the folder that contains the song currently playing.
To exit this mode, press the button again.
![]() NOTE
NOTE
• With a disc that contains both CD-DA and MP3 files, the repeat mode causes only files of the same format (CD-DA only or MP3 files only) to be repeated.
To change track playback order
Random playback for a disc (music CDs only)
If the RDM button is pressed, the RDM indicator will come on and the tracks that are played will be selected at random.
To exit this mode, press the button again.
Random playback for a folder (MP3 CDs only)
If the RDM button is pressed, the RDM indicator will come on and the tracks that are played will be selected at random from the folder that is currently selected.
To exit this mode, press the button again.
Random playback for all discs in the CD changer (music CDs only)
Press the RDM button for 2 seconds or longer (until you hear a beep). The D-RDM indicator will come on and the tracks that are played will be selected at random from all discs loaded in the CD changer.
To exit this mode, press the button again.
Random playback for all folders on a disc (MP3 CDs only)
Press the RDM button for 2 seconds or longer (until you hear a beep). The D-RDM indicator will come on and the tracks that are played will be selected at random from all folders on the disc currently selected.
To exit this mode, press the button again.
![]() NOTE
NOTE
• In the all discs random mode, if an MP3 CD has been loaded in the CD changer, the CD changer will skip over it to the next music CD. <CD changer>
• With a disc that contains both CD-DA and MP3 files, the random mode causes only files of the same format (CDDA only or MP3 files only) to be played in a random sequence.
To find the start of each track on a disc for playback
Press the SCAN button. “SCAN” will appear on the display and the audio system will play back the first 10 seconds of each track on the selected disc.
The track number will blink while the scan mode is selected.
To exit this mode, press the button again.
![]() NOTE
NOTE
• Once all tracks on the disc have been scanned, playback of the disc will restart from the beginning of the track that was playing when scanning started.
• The scan mode will be cancelled when radio or CD operation is selected.
• With a disc that contains both CD-DA and MP3 files, the scan mode causes only files of the same format (CD-DA only or MP3 files only) to be played.
To eject discs <CD player>
When the eject button is pressed, the disc automatically stops and is ejected. The system automatically switches to radio mode.
![]() NOTE
NOTE
• If you do not remove an ejected disc before 15 seconds have elapsed, the disc will be reloaded.
To eject discs <CD changer>
To eject a single disc
Press the eject button briefly to eject the currently selected disc.
![]() NOTE
NOTE
• If you press the eject button while the display is showing “LOAD DISC No. (1-6)”, the loading standby mode will be cancelled and the next disc will be ejected.
• If you do not remove an ejected disc before 15 seconds have elapsed, the disc will be reloaded and the eject mode will be cancelled.
The reloaded disc will not be played.
To eject all the discs
1. Press the eject button for 2 seconds or longer (until you hear a beep).
2. The currently selected disc will be ejected.
When you remove the ejected disc, the next disc will automatically be ejected.
3. Repeat the above-described steps until all of the discs have been ejected. The CD changer will then enter loading standby mode.
![]() NOTE
NOTE
• If you do not remove an ejected disc before 15 seconds have elapsed, the disc will be reloaded and the eject mode will be cancelled.
The reloaded disc will not be played.
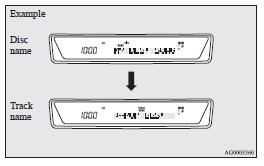
CD text and MP3 title display
This audio system can display CD text and MP3 titles, including ID3 tag information.
CD text
The audio system can display disc and track titles for discs with converted disc and track title information.
Press the DISP button repeatedly to make selections in the following sequence: disc name →
track name → normal display mode.
![]() NOTE
NOTE
• The display can show up to 12 characters. If a disc name or track name has more than 12 characters, press the PAGE button to view the next 12 characters.
• When there is no title information to be displayed, the display shows “NO TITLE”.
• Characters that the audio system cannot display are shown as “•”.
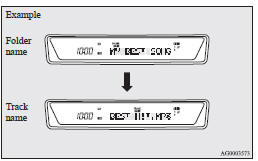
MP3 titles
The audio system can display folder and track titles for discs with converted folder and track information.
Press the DISP button repeatedly to make selections in the following sequence: folder name →
track name → normal display mode.
ID3 tag information
The audio system can display ID3 tag information for files that have been recorded with ID3 tag information.
1. Press the DISP button for 2 seconds or longer to switch to the ID3 tag information. The TAG indicator/audio system will appear on the display.
2. Press the DISP button repeatedly to make selections in the following sequence: album name → track name → artist name → normal display mode.
![]() NOTE
NOTE
• To return from ID3 tag information to the folder name, press the DISP button again for 2 seconds or longer.
• When there is no title information to be displayed, the display shows “NO TITLE”.
• The display can show up to 12 characters. If a folder name, track name, or item of ID3 tag information has more than 12 characters, press the PAGE button to view the next 12 characters.
• Folder names and track names can each be displayed up to a length of 32 characters.
Items of ID3 tag information can each be displayed up to a length of 30 characters.
• Characters that the audio system cannot display are shown as “•”.
See also:
Steering wheel lock
To lock
Press the engine switch to put the operation mode in OFF.
Open one of the doors.
To unlock
The following methods can be used to unlock the steering wheel.
• Put the operation mode in AC ...
Warning display
When the warning display or the
warning display appears on the information
screen in the multiinformation display while you are driving, take the following
measures.
When warning display is ...
Indication and warning lamp list
1- Position lamp indication lamp ®
2- High-beam indication lamp ®
3- Charge warning lamp ®
4- Turn-signal indication lamps/Hazard warning indication lamps ®
5- Front fog lamp indication lamp ...