Fuel remaining display screen
This displays the amount of fuel remaining.
![]() Caution
Caution
► Do not run out of fuel, or the catalytic converter may be adversely affected. If the warning display appears, refuel as soon as possible.
![]() Note
Note
► It may take several seconds to stabilise the display after refilling the tank.
► If fuel is added with the ignition switch in the “ON” position, the fuel gauge
may incorrectly indicate the fuel level.
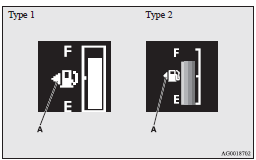
Fuel lid mark
The arrow (A) indicates that the fuel tank filler is located on the left side of the body.
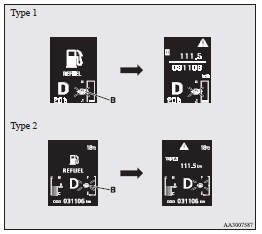
Fuel remaining warning display
When the fuel is reduced to about 8 litres, the information screen switches to
the interrupt display of the fuel remaining warning display, and the
 mark (B) on the fuel remaining display
flashes slowly (about once per second). After a few seconds, the information screen
returns from the fuel remaining warning display to the previous screen.
mark (B) on the fuel remaining display
flashes slowly (about once per second). After a few seconds, the information screen
returns from the fuel remaining warning display to the previous screen.
When the fuel is reduced further to about 5 litres, the information screen switches
to the fuel remaining warning display and the
 mark (B) on the fuel remaining display
flashes quickly (about twice per second).
mark (B) on the fuel remaining display
flashes quickly (about twice per second).
![]() Note
Note
► On inclines or curves, the display may be incorrect due to the movement of fuel in the tank.
See also:
Information screen (when the ignition switch is “OFF“)
Each time you lightly press the multi-information meter switch, the display screen
switches in the following order.
1- Odometer (Type 1)/Tripmeter
2- Odometer (Type 1)/Tripmeter
3- Service re ...
Starting
Tips for starting
► Do not operate the starter motor continuously longer than 10 seconds; doing
so could run down the battery. If the engine does not start, turn the ignition switch
back to ...
Starting the engine (diesel-powered vehicles)
1. Fasten the seat belt.
2. Make sure the parking brake is applied.
3. Depress and hold the brake pedal.
4. Fully depress the clutch pedal.
Note
► On vehicles with the Auto Stop & Go ( ...