Daytime dipper button (meter illumination control)
Each time you press this button, there is a sound and the brightness of the instruments changes.
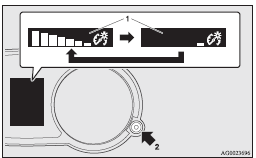
1- Brightness display
2- Rheostat illumination button
![]() Note
Note
► You can adjust to 8 different levels for when the tail lamps are illuminated
and 8 for when they are not.
► If the vehicle is equipped with the automatic lamp control, when the lamp switch
is in a position other than the “OFF” position, the meter illumination switches
automatically to the adjusted brightness, depending on the brightness outside the
vehicle.
► The brightness level of the instruments is stored when the ignition switch is
turned off.
► If you press and hold the button for longer than about 1 second when the position
lamps are illuminated, the brightness level changes to the maximum level. Pressing
and holding the button for longer than about 1 second again returns the brightness
level to the previous level.
See also:
Air selection switch
To change the air selection, simply press the air selection switch.
A sound will be made every time you push the switch.
► Outside air: Indication lamp (A) is OFF Outside air is introduced int ...
Warning activation
In order to prevent vehicle theft or the accidental operation of the keyless
operation system, the buzzer and the display on the information screen in the multi-
information display are used to al ...
Replacement of lamp bulbs
Before replacing a bulb, ensure the lamp is off. Do not touch the glass part
of the new bulb with your bare fingers; the skin oil left on the glass will evaporate
when the bulb gets hot and the va ...