
Changing the fuel consumption display unit
The display unit for fuel consumption can be switched.
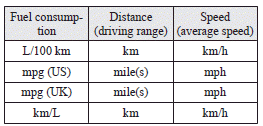
The distance, speed, and amount units are also switched to match the selected fuel consumption unit.
1. Press and hold the multi-information meter switch for about 2 seconds or more to switch from the setting mode screen to the menu screen.
Refer to “Changing the function settings (when the ignition switch is “ON”)”.
2. Lightly press the multi-information meter switch to select “AVG UNIT (fuel consumption display setting)”.
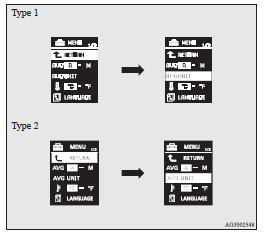
3. Press and hold the multi-information meter switch for about 2 seconds or more to display “AVG UNIT” (fuel consumption display unit setting).
4. Lightly press the multi-information meter switch to switch in sequence from km/L → L/100 km → mpg (US) → mpg (UK) → RETURN → km/L.
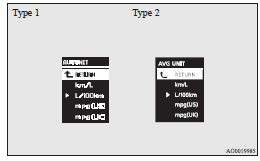
5. Press and hold the multi-information meter switch for about 2 seconds or more to change the setting to the selected unit.
 Note
Note
► The display units for the driving range, the average fuel consumption, the
average speed and the momentary fuel consumption are switched, but the units for
the indicating needle (speedometer), the odometer and the tripmeter will remain
unchanged.
► The memory of the unit setting is erased if the battery is disconnected, and it
returns automatically to L/100 km.
The distance and speed units are also switched in the following combinations to match the selected fuel consumption unit.
See also:
Interior
1. Electric window control switch
2. Lock switch
3. Electric remote-controlled outside rear-view mirrors switch
4. Central door lock switch
5. Front room & map lamps
6. Sunroof switch
...
Type 2
The key fits all locks.
1- Keyless entry key (with electronic immobilizer)
2- Key number tag ...
Windscreen washer
The windscreen washer can be operated with the ignition switch in the “ON” or
“ACC” position.
The washer fluid will be sprayed onto the windscreen by pulling the lever towards
you.
When ...