Manual mode
The manual mode is also available in case the automatic mode shows the incorrect time when the adjacent local RDS stations are located in a different time zone. Refer to “Radio data system (RDS)” on pages 5-22, 5-36.
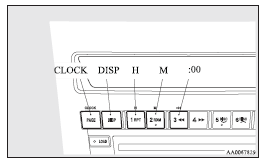
Set the time by pressing the various buttons as described below.
1. Keep the CLOCK button pressed until the time display flashes.
2. Press the appropriate buttons to adjust the time.
“H” button - To adjust the hour
“M” button - To adjust the minutes
“:00” button - To reset the minutes to zero
10:00 - 10:29......Changes to 10:00
10:30 - 10:59......Changes to 11:00
3. Once the time is set, press the “DISP” button, and the time display will stop flashing.
When a time adjustment has been made, the flashing stops automatically.
![]() Note
Note
► If the battery cables are disconnected during repairs or for any other reason,
reset the clock to the correct time after they are reconnected.
► The digital clock does not have a second display.
When the “minute” display is adjusted and reset to zero, the clock begins at zero
seconds for the selected minute.
See also:
Parking
Parking on a slope
Fully engage the parking brake, and then move the gearshift lever to 1st (on
an uphill) or reverse (on a downhill) position on manual transmission vehicle. On
automatic transmi ...
Older children
Children who have outgrown the child restraint system should be seated in the
rear seat and wear a combination lap shoulder belt.
The lap belt should be snug and positioned low on the abdomen so th ...
Mitsubishi Carisma Owner's Manual
h4 {color:#800000}
h3 {color:#0033CC}
h2 {color:#008000}
h1 {color:#FF0000}
...