To change a tyre
1. On vehicles equipped with wheel covers, first remove the covers (refer to “Wheel covers”). Then loosen the wheel nuts a quarter turn with the wheel nut wrench. Do not remove the wheel nuts yet.
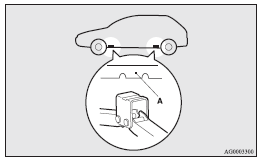
2. Place the jack under one of the jacking points (A) shown in the illustration. Use the jacking point closest to the tyre you wish to change.
![]() Warning
Warning
► Set the jack only at the positions shown here. If the jack is set at a wrong
position, it could dent your vehicle or the jack might fall over and cause personal
injury.
► Do not use the jack on a tilted or soft surface.
Otherwise, the jack might slip and cause personal injury. Always use the jack on
a flat, hard surface. Before setting the jack, make sure there are no sand or pebbles
under the jack base.
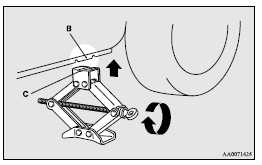
3. Rotate the jack by hand until the flange portion (B) fits in the groove (C) at the top of the jack.
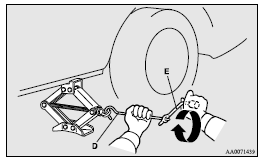
4. Insert the bar (D) into the wheel nut wrench (E). Then put the end of the bar into the shaft’s jack end, as shown in the illustration.
Slowly rotate the wheel nut wrench until the tyre is raised slightly off the ground surface.
![]() Warning
Warning
► Stop jacking up the vehicle as soon as the tyre is raised off the ground.
It is dangerous to raise the vehicle any higher.
► Do not get under your vehicle while using the jack.
► Do not bump the raised vehicle or leave it sitting on the jack for a long time.
Both are very dangerous.
► Do not use a jack except the one that came with your vehicle.
► The jack should not be used for any purpose other than to change a tyre.
► No one should be in your vehicle when using the tyre.
► Do not start or run the engine while your vehicle is on the jack.
► Do not turn the raised wheel. The tyres still on the ground could turn and make
your vehicle fall off the jack.
5. Remove the wheel nuts with the wheel nut wrench, then take the wheel off.
![]() Caution
Caution
► Handle the wheel carefully when changing the tyre, to avoid scratching the wheel surface.
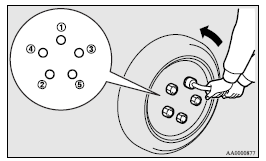
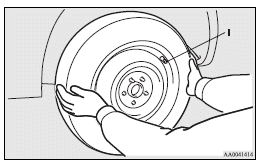
6. Clean out any mud, etc. on the hub surface (F), hub bolts (G) or in the installation holes (H) in the wheel, and then mount the spare tyre.

![]() Warning
Warning
► Mount the spare wheel with the valve stem (I) facing outboard. If you cannot
see the valve stem (I), you have installed the wheel backwards.
Operating the vehicle with the spare wheel installed backwards can cause vehicle
damage and result in an accident.
7. Finger-tighten the wheel nuts.
See also:
Safety-Optimized RISE Body Structure
The reassuringly solid feeling one gets driving the new Lancer is rooted in a
body structure engineered with greater inherent strength than its predecessor.
That is one reason the new platform can ...
Except for vehicles equipped with Twin Clutch SST
Always stop the vehicle in a safe place before operating.
The following information is included on the multi-information display: warnings,
odometer, tripmeter, service reminder, engine coolant tem ...
Waxing
Waxing the vehicle will help prevent the adherence of dust and road chemicals
to the paintwork. Apply a wax solution after washing the vehicle, or at least once
every three months to assist displa ...